Amazon Security Lake automatically centralizes an organization’s security data from cloud, on-premises, and custom sources it into a purpose-built data lake stored in a customer’s AWS account.
Amazon Security Lake reduces the complexity and costs for customers to make their security solutions data accessible to address a variety of security use cases such as threat detection, investigation, and incident response. Amazon Security Lake is one of the many solutions that now supports the Open Cybersecurity Schema Framework (OCSF), an open industry standard, making it easier to normalize and combine security data from AWS and dozens of enterprise security data sources.
Operationalizing the above (and additional) scenarios on top of the security data lake requires a set of basic building blocks that can either be used directly by SecOps professionals, or combined into larger workflows driving specific outcomes.
Executing Automated Actions as a Response to Security Events
As an Amazon Security Lake subscriber, Torq consumes logs and events from Security Lake. In order to control costs and adhere to least privilege access best practices, Torq workflows can be automatically notified of new Amazon S3 objects for a source as the objects are written to the Amazon Security Lake by setting up one or more data access subscribers. Data access subscribers are notified of new Amazon S3 objects for a source as the objects are written to the Security Lake data lake.
In Torq, this notification is received in an Integration Webhook, so the first step of the configuration process is to create a new Webhook integration in Torq, as described in Torq’s documentation here. Take note of the resulting Webhook integration URL (endpoint), as it will be needed to set up a data access subscriber in Amazon Security Lake.
Completing the creation of the subscriber also requires setting up a new AWS Integration in Torq, as described in Torq’s documentation here. This integration will also be used afterwards to pull data from the Security Lake in Torq Workflows. As described in Torq’s documentation, setting up an AWS Integration requires creating a new Role in AWS Identity and Access Management. For that role to be able to pull data from the security lake, please sure to add the following permission policies to the role:
- Create a new IAM Policy with the following contents:
{ "Version": "2012-10-17", "Statement": [ { "Sid": "AllowInvokeApiDestination", "Effect": "Allow", "Action": [ "events:InvokeApiDestination" ], "Resource": [ "arn:aws:events:*:{accountId}:api-destination/AmazonSecurityLake*/*" ] } ]}Make sure to replace “{accountId}” in the JSON above with your own AWS Account ID.
- Add this policy to the Permissions Policies for role you’re creating for Torq’s Integration
- Add the following policy to the Permissions Policies of the role AmazonAthenaFullAccess (this is needed to enable querying, writing results, and data management through Amazon Athena, which is how Torq workflows will query data from the AWS Security Lake.
While setting up the AWS Integration in Torq, take note of the Torq Account ID and the AWS External ID, as you will need these in the process for creating a custom subscriber
Next, follow the following steps to set up a new Data Access Subscriber through your AWS Console:
- Open the Amazon Security Lake console at https://console.aws.amazon.com/securitylake/.
- In the navigation pane, choose Subscribers.
- Click Create subscriber.
- For Subscriber details, enter the subscriber’s name and (optionally) a description.
- For Log and event sources, choose from which sources you want to receive notifications in your previously created Torq webhook (you can choose whether you want to send notifications from all your Amazon Security Lake sources to Torq or select specific sources for each subscriber).
- For Data access method, choose S3 to set up data access for the subscriber.
- For Subscriber credentials, provide the Torq Account ID and the AWS External ID you got from AWS integration in Torq for AWS account ID and external ID, respectively.
- For Notification details, select Subscription endpoint so that your Amazon Security Lake can send notifications through EventBridge to the HTTPS endpoint of the Torq Webhook created previously.
- For Service Access, select the IAM role named AWSServiceRoleForAmazonEventBridgeApiDestinations, which is automatically created during the Amazon Security Lake set up process when run from the AWS Console, and which gives EventBridge permission to invoke API destinations and send object notifications to the correct endpoints.
- Provide the Torq Webhook integration URL (endpoint) as the subscription endpoint.
- Choose Create.
- Check the configuration of Subscription associated with the Amazon SNS Topic which has been created as a result of the previous steps, and verify that Raw message delivery is enabled for the Subscription. Enable it by editing the Subscription if it wasn’t.
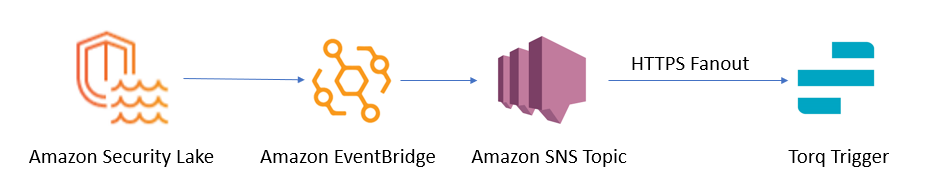
Schematic configuration of Amazon Security Lake subscribers triggering Torq workflows
Depending on the settings you defined in step #5 above (Log and event sources) it might be necessary to define trigger conditions in your Torq workflows triggered from Amazon Security Lake events. Here’s an example of a trigger condition meant to restrict a workflow to be triggered by Route53 events in Amazon Security Lake from a region us-east-1 only:
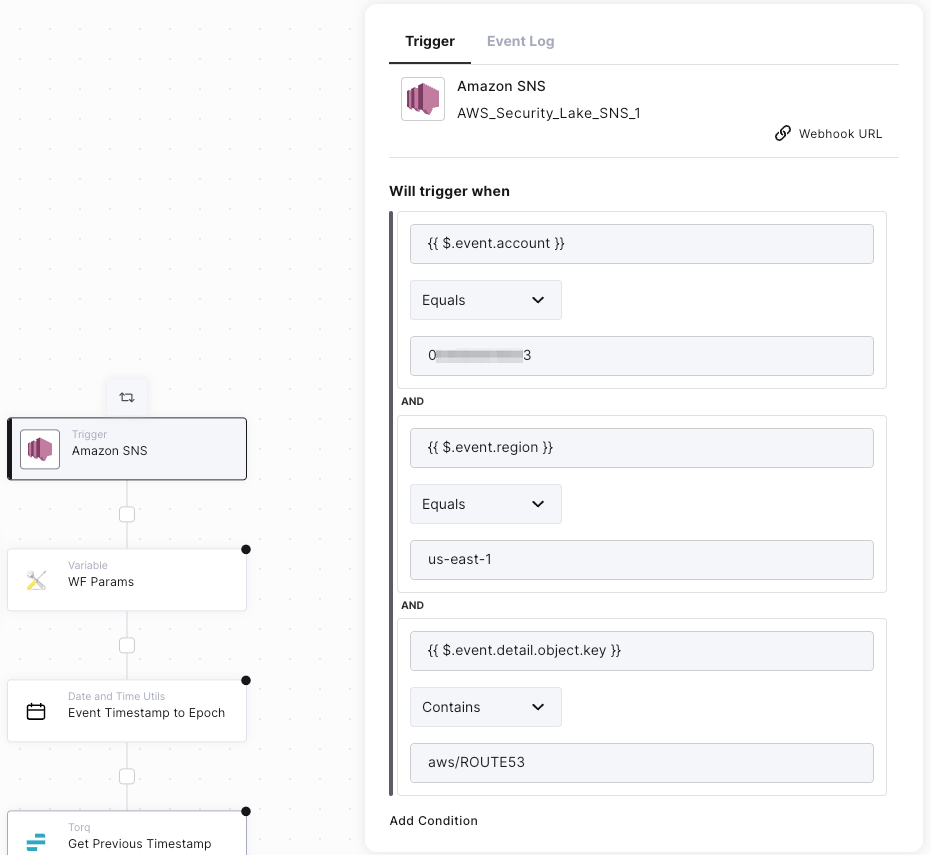
A Torq workflow trigger condition definition example to restrict a workflow to be triggered only by Amazon Security Lake events for a specific account id, region and data source (such as AWS Route53)
Querying Data from Security Data Lake
The Amazon Security Lake creation and set up process run from the AWS console, automatically registers each Security Lake region as a new Database in AWS Athena.
AWS Athena is a serverless service which allows querying Amazon Security Lake S3 data (with an S3 bucket per region for which the Security Lake has been enabled) using SQL.
Querying Amazon Security Lake data from Torq workflows, either automatically triggered from Security Lake events, scheduled to periodically pull notifications of new objects by polling an Amazon Simple Queue Service (SQS) queue or run on-demand to search for specific data in the Security Lake, can be easily implemented by using SQL in AWS CLI steps to query Athena’s API.
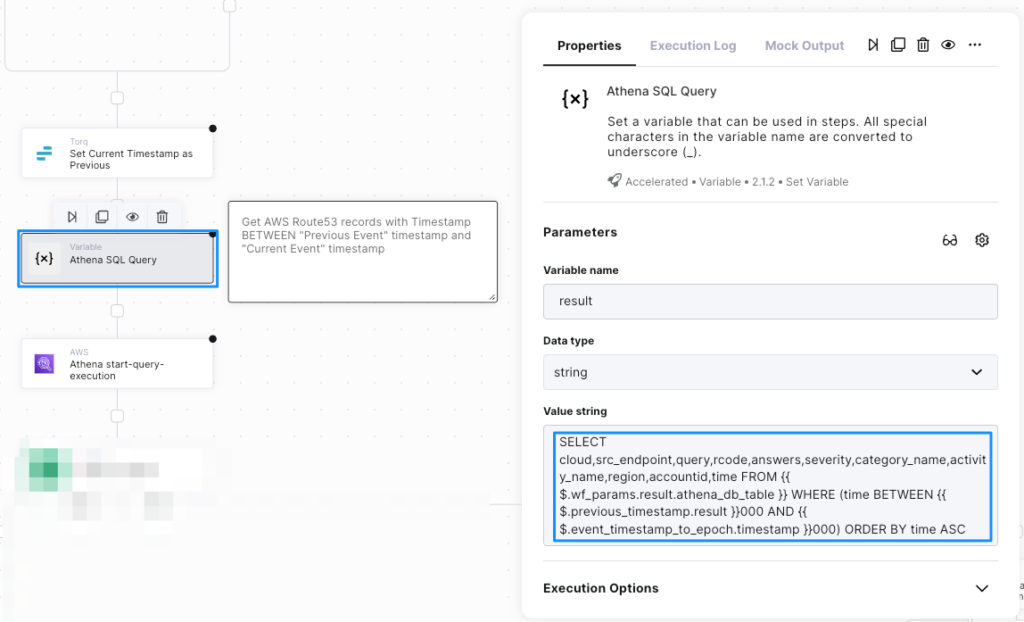
The following figures illustrates the process of querying Amazon Security Lake from Torq Workflows in 3 steps:
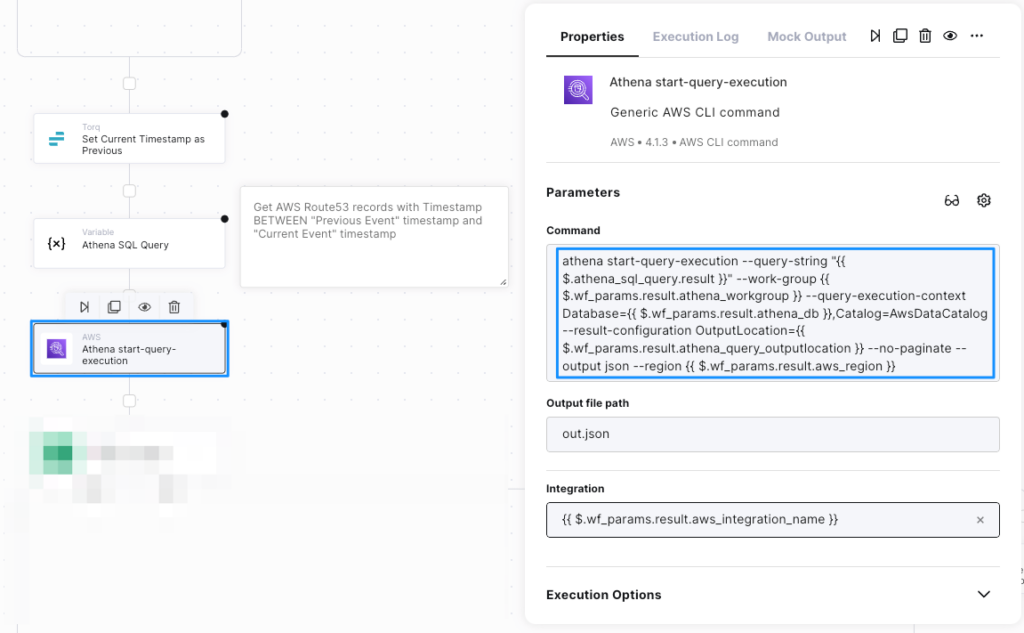
- Creating a dynamic SQL query for AWS Athena:
- Using AWS CLI to execute the query in AWS Athena:
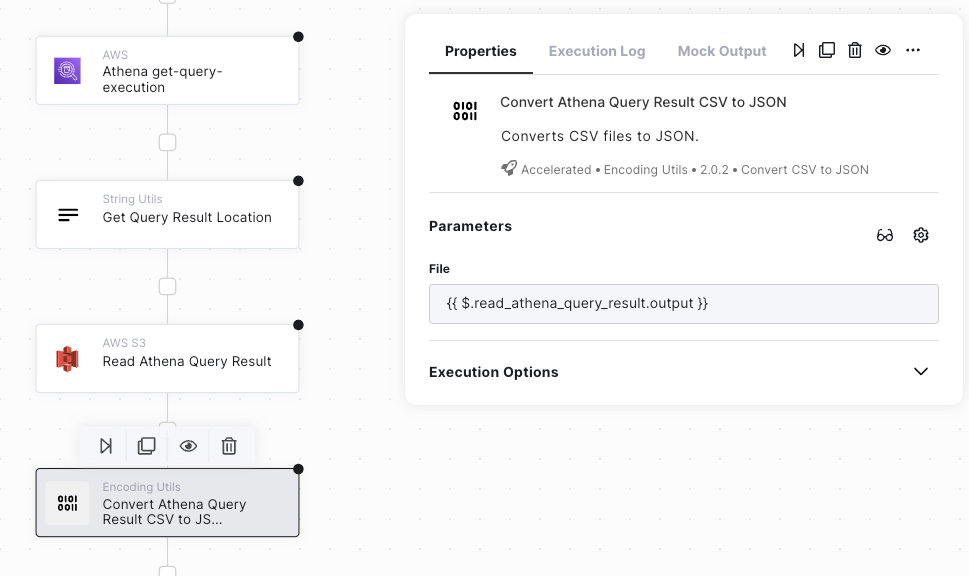
- The result of Athena SQL queries is stored as a csv document in S3 and can be easily pulled into a Torq workflow by using an AWS S3 Read File step, and then the Convert CSV to JSON step from Torq Utilities to simplify data extraction and transformation in later steps in the workflow:
Bringing It All Together
Operationalizing Security Operations with fully automated or human-in-the-loop pipelines using the above “building blocks” is a process consisting of the following phases:
- Identifying the relevant security events:
Torq triggers can be configured with conditions, expected from the delivered event, in order to start performing automatic actions. In some cases, looking just at the event data might not be sufficient to decide whether it requires a certain security follow-up or not. For these scenarios, following up with additional automated enrichment and investigatory steps can be performed with Torq workflow steps.
- Defining the required enrichment / hydration data:
Upon receiving a security event that has a potential for a follow-up, certain parts of it, such as (but not limited to) User Identifiers, Device Identifiers, Network Addresses, etc… should be retrieved for further enrichment with additional systems (IAM, CMDB, Threat Intelligence and more) by introducing initial steps in a workflow triggered by security lake events.
- Building the pipelines – what happens when the event occurs:
Defining the response process can take place in an iterative manner. Main questions that need to be addressed are:- What additional information do we need to be able to better classify the event
- Once classified, are there external notification / orchestration systems that need to be updated with this information
- If building a human-in-the-loop pipeline, which role-players need to be provided an information about this event
- If performing automatic remediation actions – what are they and which role-players can approve executing them
Summary
Amazon Security Lake provides a flexible and scalable repository for different kinds of security events. In order to build flexible and scalable security operations, your teams will require this data to be at their fingertips with the ability to efficiently use it and to trigger processes based on it.
Implementing Torq workflows, that can be triggered either
- Manually by security professionals via Messaging / Chat or Web
- By identifying specific events reaching the security lake
- By using detections made by 3rd party security products
In these workflows, following capabilities can be delivered to security professionals:
- Retrieve data from security lake and present it to security role-players in a convenient fashion
- Enrich operational systems with context from the security lake
- Process the security lake data to make decisions on severity and priority of different security events
- Suggest and execute containment and remediation strategies based on processed contextual data
Examples of these and additional scenarios can be found at Torq Template Library.