Torq AMP spotlights the partners redefining what’s possible in security operations. Each partner brings a unique strength that seamlessly extends Torq’s autonomous SOC platform. Together, these partnerships help SOC teams achieve speed, accuracy, and scale that were once out of reach. Explore the future of SOC in the AMP’d Sessions video series.
Security operations centers (SOCs) have long been stuck in a reactive, overwhelmed state. Analysts are swamped with alerts. Triage is repetitive. Even the biggest teams can’t keep up.
Torq and Intezer are rewriting the SOC playbook with agent-to-agent AI collaboration. Together, we’re showing how two AI-driven platforms can work seamlessly to handle the entire alert lifecycle — from detection to triage to remediation — completely autonomously, at machine speed.
Why SOCs Need Agent-to-Agent AI
Every SOC leader knows the math doesn’t add up. Cloud adoption, SaaS sprawl, and AI-powered adversaries have all converged to push SOCs beyond their limits. Alert volumes climb year after year, yet most teams can only investigate a fraction of them. Burnout is rampant, with analysts stuck in repetitive triage instead of higher-value work.
Traditional SOAR tools tried to automate some of the load, but rigid playbooks and partial integrations left the real problem — scale — unsolved. The result is a SOC that remains reactive, noisy, and perpetually behind.
Intezer and Torq are solving that together:
Intezer AI agents emulate elite analysts, performing deep, forensic-grade investigations at speed.
Intezer is known for forensic-grade analysis — and they’ve built AI agents to scale that expertise. Their agents investigate alerts like a senior analyst would by:
Asking the right triage questions
Checking tools and data sources in the right order
Validating threats even if a mitigation attempt has already occurred
By automating these investigation steps, Intezer filters out noise and escalates only the threats that truly matter. Customers see 4% of alerts escalated in as little as two minutes with 97.6% accuracy.
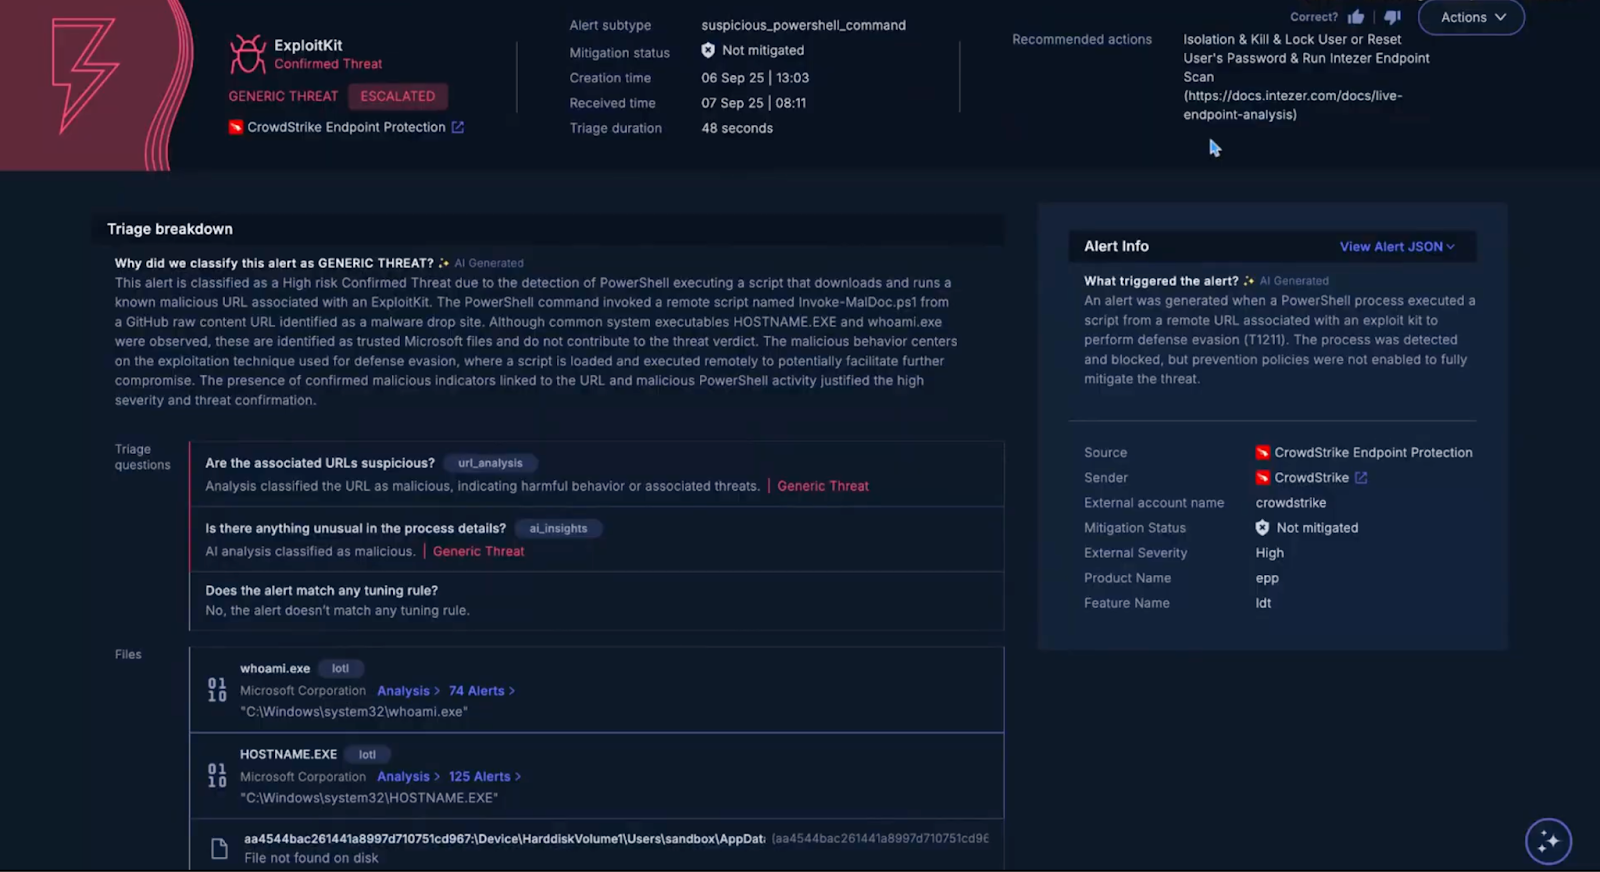
Intezer confirms a high-severity PowerShell exploit with malicious URLs and anomalies, escalating to Torq for automated response.
Step 2: Triage and Remediation with Torq AI Agents
Once Intezer triages the initial event, Torq Socrates, the AI SOC Analyst, and its AI agents, designed to act like a Tier-1 and Tier-2 team, take over. Here’s what happens next:
Case creation: Torq automatically builds a case enriched with all IOCs, observables, and investigation notes from Intezer.
Context enrichment: Socrates correlates data across SIEM, EDR, IAM, cloud, and more, ensuring the case has full context.
Runbook planning: Socrates generates a remediation plan, which includes isolating hosts, locking accounts, resetting credentials, or running endpoint scans.
Autonomous execution: Socrates triggers Hyperautomation workflows that execute those actions across the connected stack, step by step, until the threat is contained and remediated.
Resolution: The case is closed with full audit-ready documentation.
The handoff is seamless. Intezer ensures the right alerts are surfaced, and Torq ensures they’re fully resolved.
Intezer alert fully resolved in Torq — with automated isolation, account disablement, and endpoint scanning — and a Socrates-generated summary documenting every autonomous action taken.
Speed, Accuracy, and Scale
The numbers tell the story:
97.6% accuracy in Intezer’s AI-driven triage
90% reduction in manual investigation effort for Torq customers
3–5× increase in alert handling capacity without adding headcount
95%+ of Tier-1 and Tier-2 cases remediated autonomously
For analysts, this means less alert fatigue and burnout and more time for threat hunting, detection engineering, and strategic projects. For SOC leaders, it means world-class outcomes without ballooning costs.
“Everyone is looking for speed, but we’re also removing burnout — freeing analysts to focus on the most important cases.”
This is the future of the SOC: AI agents collaborating seamlessly to handle the noise and remediate threats at scale. Most importantly, it gives analysts back the time and focus they need to do the kind of cybersecurity work that truly matters.
A formal incident response plan defines roles, responsibilities, escalation paths, and communication protocols before an incident ever occurs.
Playbooks create consistent, repeatable responses for specific incident types.
Speed is the defining variable in containment: organizations take an average of 204 days to identify a breach and 73 days to contain it, according to the IBM Report. Automation closes that gap.
AI-driven triage and predefined automated containment actions — such as endpoint quarantine and access revocation — dramatically reduce MTTD and MTTR.
The Torq 2026 AI SOC Leadership Report shares that 90% of security leaders say AI has positively impacted SOC workload.
No one wants to be mid-breach, staring at a flood of alerts, wondering who’s supposed to be doing what. Yet that’s exactly where many security teams find themselves when an incident hits.
The financial stakes are significant. According to the IBM Cost of a Data Breach Report, the global average cost of a data breach fell to $4.44 million in 2025 — down 9% from $4.88 million the prior year, marking the first decline in five years, driven by faster detection and containment powered by AI-driven defenses. But that global improvement masks a more troubling reality closer to home: U.S. breach costs hit a record high of $10.22 million.
The difference between a contained incident and a catastrophic one often comes down to how prepared your team was before the alert fired. This guide walks through incident response best practices across the six phases of the incident response (IR) lifecycle — from preparation through lessons learned — with a focus on building processes that are repeatable, communication-driven, and increasingly automated.
It’s Time to Prepare for a Security Incident
The old saying holds: you don’t rise to the occasion; you fall to your level of preparation. In incident response, preparation is everything. You’re not ready for what you haven’t planned for.
Develop and Maintain a Formal IR Plan
Your incident response plan needs to live, breathe, and evolve alongside your threat landscape. It should define:
Clear roles and responsibilities for every stakeholder (IT, Legal, Communications, Executive)
Escalation paths and decision-making authority
Communication protocols for both internal teams and external parties
Criteria for what constitutes a “security incident” worth escalating
The plan only works if people actually know it exists and understand their role in it. Socialize it broadly and revisit it annually — or after any major incident or organizational change.
Build and Test Incident Response Playbooks
A plan tells you what to do. Playbooks tell you how to do it, step by step, for specific scenarios. Build out playbooks for your most common incident types: phishing, ransomware protection, credential compromise, insider threats, and supply chain attacks, to name a few.
Good playbooks remove ambiguity. When an analyst is under pressure at 2am, the last thing they should be doing is improvising. Playbooks create a consistent, repeatable response regardless of who’s on shift — and they’re the foundation of incident response automation when you’re ready to operationalize them at scale.
Conduct Regular Training and Tabletop Exercises
Writing the playbook is step one. Testing is where most teams fall short.
Run tabletop exercises at least twice a year and make them cross-functional. Pull in Legal, HR, Communications, and Executive leadership, not just IT and security.
These exercises surface gaps before a real attacker does, build muscle memory across the team, and often reveal uncomfortable truths about communication bottlenecks or unclear ownership. That’s exactly the point.
Identification and Containment of a Security Incident (Speed Is Key)
Once something is happening, every minute matters. According to the IBM Report, organizations took an average of 204 days to identify a breach and another 73 days to contain it — a combined lifecycle of nearly 9 months. Breaches contained within 200 days averaged $3.61 million in costs; those that stretched beyond that mark averaged $4.87 million.
Time is money, quite literally.
Centralize Alert Triage with Automation
Your analysts cannot manually sift through thousands of alerts per day and catch what matters. This is where SIEM and modern AI-driven platforms earn their keep.
Centralizing alert ingestion and automating correlation, prioritization, and routing dramatically reduces Mean Time to Detection (MTTD). The IBM report found that organizations that extensively use AI and automation across their SOC saw their time to identify and contain a breach cut by nearly 100 days on average compared to those that do not use these technologies. The goal is to get the right information in front of the right analyst as fast as possible, with the noise already filtered out.
Torq’s own 2026 AI SOC Leadership Report, based on a survey of more than 450 CISOs and security leaders, found that 72% of teams are now comfortable with fully autonomous AI handling medium-severity incidents and below — the alerts that make up the bulk of SOC volume. SOC teams that embrace AI-driven triage aren’t replacing analysts; they’re freeing them up for the work that actually requires human judgment.
Enforce Pre-Defined Containment Strategies
For high-severity threats, containment cannot wait for a human to read an email and decide what to do. Pre-define your containment actions and, where possible, automate them.
Common automated containment steps include network segmentation, endpoint quarantine, and access revocation. When these are tied to specific threat signatures or alert conditions, they can execute in seconds — stopping lateral movement before it becomes a full-blown breach. Automated SOC incident response workflows make this kind of speed achievable without burning out your analysts.
Treat Communication as a Core Incident Response Best Practice
This one gets underestimated constantly. When an incident is active, poor communication is often as damaging as the attack itself — both internally and externally.
Before an incident happens, establish a dedicated, secure communication channel (a separate incident Slack channel, a secure bridge line, etc.) so critical information doesn’t get buried in normal traffic. Pre-draft templated messages for key stakeholders: what executives need to know, what Legal needs to escalate, what customers need to hear. When the time comes, you want to be filling in the blanks, not writing from scratch.
Eradication and Recovery from a Security Incident (Restoring Trust)
Containment stops the bleeding. Eradication and recovery close the wound and get you back on your feet — but rushing this phase is a mistake many organizations make. IBM’s data shows that only 12% of breached organizations fully recovered, and for most of those, recovery took more than 100 days.
Focus on Root Cause Eradication
Patching the symptom and calling it done is how you get hit by the same attack twice. Before restoring any affected system to production, make sure you’ve identified and eliminated the root cause — the actual access vector the attacker used to get in.
This means validating that malicious persistence mechanisms (backdoors, compromised credentials, malicious scheduled tasks) are fully removed and that any exploited vulnerabilities are patched. Check out common security incident categories to better understand the typical root causes tied to different attack types.
Secure System Recovery with Known Good Backups
Restoring from backups sounds straightforward, but the “known good” part is a lot of work. Backups need to be regularly validated and, ideally by an active attacker.
After restoring, validate system integrity before bringing anything back online. Monitor restored systems closely for signs of residual infection in the first 24–72 hours. Trust, but verify — then verify again.
Isolate and Preserve Forensic Evidence
This step often gets skipped in the rush to recover, and that’s a problem. Logs, memory dumps, disk images, and network captures collected during an incident are invaluable for the post-mortem, potential legal action, and regulatory compliance.
Collect and preserve forensic evidence in a secure, tamper-evident manner — separate from the systems being remediated. IBM’s research found that organizations that involved law enforcement in ransomware incidents saw breach costs reduced by roughly $1 million on average. Preserved forensic evidence is what makes that coordination possible. Once it’s gone or contaminated, you can’t get it back.
Lessons Learned from a Security Incident (Continuous Improvement)
The incident is over. The temptation is to close the ticket and move on. Resist that temptation.
Conduct a Blameless Post-Mortem
A blameless post-mortem is exactly what it sounds like: a structured review of what happened, why defenses failed, and how to prevent recurrence — without assigning personal fault to individuals.
This framing matters more than it might seem. When people fear blame, they get defensive, withhold information, and you learn less. When the focus shifts from people to systems and processes, you get honest answers and actionable insights. Document technical failures, procedural gaps, and communication breakdowns. All of it is fair game.
Aim to hold the post-mortem within a week of resolution, while details are still fresh.
Implement Actionable Improvements
A post-mortem that doesn’t result in change is just a meeting. Convert every finding into a concrete, assigned, time-bound action item — whether that’s patching a vulnerable system, revising a playbook, adding a detection rule, or making the case for a new tool.
Track completion of these items like you’d track any other project. Report on progress to leadership. This is how incident response matures from reactive to genuinely resilient.
The IBM data reinforces the ROI here: organizations with established IR teams and regular security testing saved an average of $248,000 per year compared to those without, and those savings compound with every iteration of improvement.
Torq’s Role in Operationalizing Incident Response Best Practices
Reading about IR best practices is easy. Executing them consistently, at speed, across a sprawling and constantly changing security tool stack — that’s the hard part.
Torq’s own research underscores just how hard. The 2026 AI SOC Leadership Report found that while 90% of security leaders say AI has positively impacted SOC workload, the average SOC is still running 7 separate AI-powered tools — with 80% relying on fragmented point solutions rather than a unified platform.
AI is working. The way it’s been deployed isn’t.
That’s the gap the Torq AI SOC Platform is built to close. Torq provides the orchestration layer that enforces incident response best practices at machine speed — automatically triaging alerts, executing containment actions, routing escalations, and keeping communication flowing, all without requiring an analyst to manually touch every step.
Torq’s AI Agents for the SOC can be deployed across the full IR lifecycle: from initial detection through containment and into case management. And with Case Management built in, every incident is automatically documented — giving your team the forensic trail they need for post-mortems and compliance, without adding manual work.
For teams that want to build and customize agentic response workflows without a deep engineering lift, Torq’s Agentic Builder makes that possible. And for a deeper look at what AI is actually doing inside modern SOCs, the 2026 AI SOC Leadership Report breaks it all down with data from more than 450 CISOs and security leaders.
The Gap Between Plan and Reality
Effective incident response is a measure of organizational maturity. Any security team can write a plan. The ones that consistently limit breach impact are the ones that have tested it, automated the repetitive parts, and committed to learning from every incident — not just the bad ones.
Here’s the question worth sitting with: How wide is the gap between your documented IR plan and your actual response time the last time something went wrong?
If the answer makes you uncomfortable, that’s useful information. Start with preparation, invest in automated incident response, and build the muscle for blameless continuous improvement. The next incident is coming. The only variable is how ready you’ll be.
Ready to see what 450+ security leaders revealed about the state of AI in the SOC?
What are the six phases of the incident response lifecycle?
The six phases of incident response are: Preparation, Identification, Containment, Eradication, Recovery, and Lessons Learned. Preparation involves building IR plans and playbooks before an incident occurs. Identification focuses on detecting and confirming a security incident. Containment limits the spread of the threat. Eradication removes the root cause. Recovery restores systems to normal operations. Lessons Learned captures what happened and drives continuous improvement through post-mortems and process updates. For a deeper dive into each phase, see Torq’s incident response plan guide.
What should be included in an incident response plan?
An incident response plan should define roles and responsibilities for all stakeholders — including IT, Legal, HR, Communications, and Executive leadership — along with clear escalation paths, decision-making authority, and communication protocols for both internal and external parties. It should also establish criteria for what qualifies as a reportable security incident, include step-by-step playbooks for common incident types, and outline procedures for preserving forensic evidence. The plan should be reviewed and updated at least annually and tested regularly through tabletop exercises. See common security incident categories to help inform which playbooks to prioritize.
What is a blameless post-mortem in incident response?
A blameless post-mortem is a structured review conducted after a security incident is resolved. The goal is to understand what happened, why defenses failed, and how to prevent recurrence — without assigning personal fault to individuals. The focus stays on systems, processes, and procedural gaps rather than individual mistakes. Findings are documented and converted into prioritized, assigned action items. This approach encourages honest reporting, surfaces more useful insights, and drives continuous improvement in security posture. The Torq 2026 AI SOC Leadership Report explores how leading security teams are structuring continuous improvement across their SOC operations.
How does automation improve incident response?
Automation reduces the time it takes to detect and contain security incidents by eliminating manual, repetitive steps from the response process. Rather than waiting for an analyst to read an alert and decide on next steps, automated workflows can instantly triage alerts, quarantine affected endpoints, revoke compromised credentials, and notify stakeholders — all within seconds of detection. The IBM Cost of a Data Breach Report found that organizations using AI and automation extensively across their SOC identified and contained breaches nearly 100 days faster than those that did not, and incurred an average of $2.22 million less in breach costs. Learn more about how automated SOC incident response works in practice.
What are the most important incident response best practices for 2026?
The most critical incident response best practices in 2026 center on preparation, speed, and continuous improvement. That means maintaining a formal IR plan with defined roles and tested playbooks, centralizing alert triage with AI-driven automation to cut detection and containment times, enforcing pre-defined containment actions for high-severity threats, preserving forensic evidence for post-incident analysis, and conducting blameless post-mortems that produce concrete, tracked action items. Organizations that combine established IR teams, regular testing, and AI-driven automation see measurably lower breach costs and faster recovery times.
Eldad Livni is the Co-Founder and Chief Innovation Officer at Torq. Prior to founding Torq, Eldad co-founded and served as CPO of Luminate Security, a pioneer in Zero Trust/SASE. Following Luminate’s acquisition by Symantec, he went on to act as CPO of Symantec’s Zero Trust/Secure Access Cloud offering.
The security industry has a new buzzword problem. Walk through any major security conference, and you’ll hear every vendor claiming they’ve built “agentic AI” into their platform. But strip away the marketing speak, and most solutions are just basic automation with an AI label slapped on top.
SOC teams aren’t buying it. They’re drowning in 10,000+ daily alerts, facing a global talent shortage of 4.76 million cybersecurity professionals, and up against adversaries who now move laterally in less than an hour. They need real solutions, not rebranded point tools.
That’s where true agentic automation comes in — and why Torq HyperSOC™ represents a fundamentally different approach to AI-powered security operations.
The Agent-Washing Problem
Here’s the uncomfortable truth: most “agentic AI” in security isn’t actually agentic. It’s usually one of two things: deterministic workflows — rigid rules that break as soon as attackers change tactics; or chatbot-style agents — useful for summaries but incapable of acting autonomously or coordinating at scale.
Reason autonomously across complex security scenarios
Collaborate with other agents to solve multi-step problems
Adapt dynamically to novel threats and environments
Execute actions independently while maintaining human oversight
Learn and improve from each interaction
Few platforms check those boxes. Torq does.
What True Agentic Automation Looks Like
Most SOC automation is still sequential — whether through scripted workflows or single AI agents mimicking Tier-1 analysts. Tasks run one at a time, slowing investigations and leaving room for missed edge cases.
Multi-agent systems break this bottleneck. Multiple specialized agents work in parallel, each focusing on its domain — from email analysis to endpoint forensics — while continuously sharing context. As new evidence emerges, they adapt dynamically, delivering investigations and remediation in seconds instead of minutes.
Torq takes this further with Hyperautomation: AI-driven security operations that move beyond rule-based responses to deliver autonomous detection, investigation, and remediation. At the core of our multi-agent system is Socrates, our AI SOC Analyst, supported by specialized HyperAgents that handle everything from triage to containment. Together, they achieve outcomes that traditional SOAR platforms or “AI add-ons” simply can’t match.
Autonomous investigation: When a potential phishing email hits your environment, multiple agents launch at once — one inspects headers, another scans attachments, and a third checks threat intel, finishing in seconds, not minutes.
Dynamic remediation: Instead of scripting every step, AI agents evaluate context in real time and choose the right actions — blocking, removing, quarantining, or notifying — simplifying maintenance and covering edge cases workflows miss.
Collaborative intelligence: Our agents continuously share context and coordinate actions. They escalate to human analysts only when necessary, meaning most phishing alerts are resolved without manual intervention.
Other agentic automation platforms? At best, you could script this with workflows and drop in an AI step for summarization. The difference: Torq executes a full case lifecycle end-to-end, autonomously.
The Business Impact of True Agentic Automation
Unlike traditional automation that requires constant tuning and breaks with environmental changes, agentic automation delivers measurable business outcomes, including the ability to:
Scale without headcount: Torq customers automate over 95% of Tier-1 security operations, effectively scaling their SOC without adding analysts.
Speed that matters: While the industry average breakout time has dropped to 48 minutes, organizations using Torq’s agentic automation contain threats in seconds, 10x faster than legacy SOAR. Speed isn’t just an advantage; it’s the difference between a contained incident and a full breach.
Adaptive defense: Traditional SOAR playbooks break when attackers change tactics. Torq’s agentic automation adjusts in real time — adapting to new findings and edge cases during a session to stay on track. Beyond that, it learns across sessions, remembering preferences and tuning rules so your defenses continually improve. Your defenses evolve as fast as the threats.
Human-AI Collaboration, Not Replacement
What separates real agentic automation from marketing hype is that it’s designed to augment human expertise, not replace it. Torq doesn’t aim to replace analysts. Instead, AI agents take on the repetitive work — triage, enrichment, initial containment — so humans can focus on threat hunting, strategic projects, and high-stakes response.
When agents do escalate to humans, they provide complete context, suggested actions, and all supporting evidence. Analysts aren’t starting from scratch; they’re picking up where AI left off, with everything they need to make informed decisions.
Transparent decisions: Every AI (generative and agentic) action is explainable, auditable, and logged.
Human control: Escalation and override steps keep analysts in charge.
Enterprise security: Zero-trust AI architecture with encryption, validation, and attack resistance.
Compliance by default: Audit-ready trails and standards alignment (including ISO/IEC 42001) are built in. Unlike black-box AI tools, Torq combines deterministic, well-tested workflows with AI guardrails — so you decide the balance between autonomy and oversight. Sensitive actions can always stay human-in-the-loop, while AI is equipped with trusted, validated tools to operate safely and predictably.
For enterprises and MSSPs, this means confidence that every automated action is both effective and accountable.
The Path Forward with Agentic Automation
The security industry is at an inflection point. Organizations can continue patching together point solutions and calling it “agentic,” or they can embrace platforms built for autonomous security operations. With Torq, SOCs scale without adding headcount, stop threats in seconds, and empower analysts instead of burning them out.
The question isn’t whether agentic AI will transform security operations — it already has. The question is whether your organization will lead that transformation or be left behind by vendors still playing catch-up with marketing buzzwords.
Ready to move beyond agent-washing? Read the AI or Die Manifesto to learn how to approach AI in the SOC the right way.
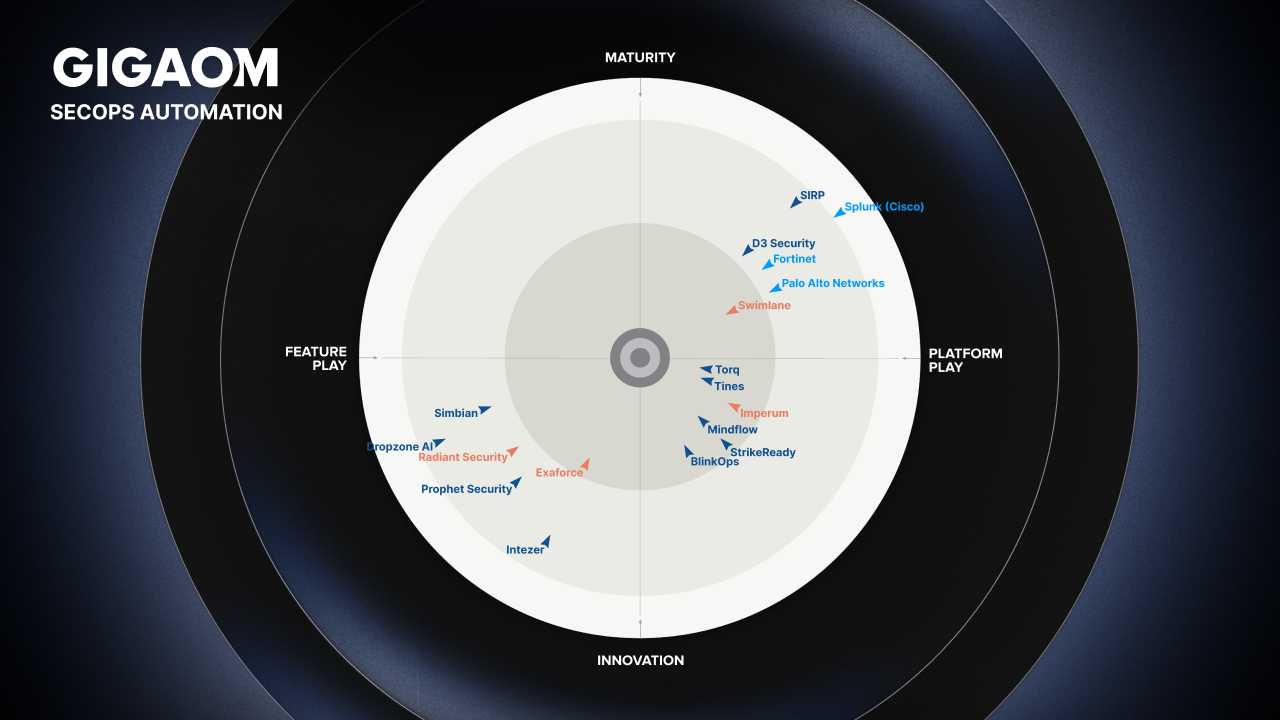
The 2025 GigaOm Radar Report for SecOps Automation has named Torq a Leader and Fast Mover. The category’s shift this year away from SOAR to SecOps Automation confirms what SOC leaders already know, and Torq has been saying for years: Legacy SOAR is done. Too rigid, too slow, and too fragile, SOAR can’t keep up with today’s adversaries.
Purpose-built for speed, scale, and safe autonomy, Torq HyperSOC™ is the solution closest to the high-value bullseye of GigaOm’s SecOps Automation Radar. The GigaOm report validates what our customers prove daily: Torq is helping set the pace for SecOps automation.
SOAR Is Dead — And We Were the First to Say It
When Torq declared “SOAR is dead”, it wasn’t just a marketing tagline — it was a reality check. Legacy SOAR platforms were never designed for the scale, complexity, or speed of modern SOC operations. They rely on brittle playbooks, endless scripting, and rigid integrations that collapse under today’s machine-speed adversaries.
For years, vendors tried to rebrand SOAR, but the cracks were obvious:
Too slow to keep up with modern attack timelines.
Too code-heavy for teams already stretched thin.
Too limited to unify security, IT, and business operations.
The 2025 GigaOm Radar for SecOps Automation is the clearest signal yet: the market has officially moved on. What once fell under SOAR is now evaluated through the lens of SecOps automation — end-to-end, AI-driven workflows that unify the SOC and deliver automated triage, investigation, and response at scale.
Why Torq Stood Out in the GigaOm Radar
For the past three years, Torq Hyperautomation outperformed legacy SOAR on the GigaOm SOAR Radar. With GigaOm now evolving the category to SecOps Automation, Torq once again ranks closest to the bullseye.
The Torq platform stood out in GigaOm’s 2025 Radar for its ability to combine no-code, low-code workflows with extensive integrations across the modern SOC stack and advanced case management. Analysts highlighted Torq’s strengths in key areas:
Case management and collaboration: An area where Torq earned a top score, with a built-in case management system, seamless integrations with ServiceNow, Jira, Zendesk, Slack, Teams, and Webex, plus virtual war rooms and role-based access controls to keep security, IT, engineering, and business teams aligned.
SIEM and SDL integrations: Torq consolidates multiple signals across assets, teams, and timeframes into enriched, prioritized events. With deterministic filtering and anomaly detection integrations, SOCs can cut through noise and accelerate investigations.
Red teaming and validation: Every workflow can be safely tested and validated in staging before production. Audit trails, version control, and deterministic outcomes ensure responsible deployment and compliance-ready automation.
Future-ready architecture: GigaOm highlights architecture as the top decision factor in SecOps automation. Torq’s multi-agent, event-driven design combines the predictability of deterministic workflows with the power of LLMs — delivering autonomy that adapts to real-world complexity.
AI agent guardrails: GigaOm gave Torq a perfect 5 in AI Agent Guardrails, validating what enterprises already trust us to deliver: safe, scalable AI for the SOC. Every Torq decision is explainable, auditable, and transparent, with built-in governance frameworks that ensure accuracy, compliance, and accountability. From human-in-the-loop workflows and override mechanisms to zero-trust AI architecture with continuous monitoring, Torq is built for enterprise-grade safety.
Why This Matters for Security Leaders
Today’s SOC leaders face three hard realities:
Alert volume keeps climbing. The average enterprise SOC receives tens of thousands daily alerts, of which at least 30% are never investigated.
Adversaries are moving faster than ever. Breakout time has shrunk to 48 minutes on average — with some intrusions moving laterally in under a minute.
Legacy tools are slowing SOCs down. Torq addresses these challenges head-on with automation built for speed, scale, and resilience.
Unified SOC operations: Case-first automation, 300+ integrations, and end-to-end workflows break down silos and align security, IT, and business teams.
Autonomy at scale: Torq auto-remediates more than 90% of Tier-1 tasks and slashes investigation times from auto-triage to full case resolution.
Enterprise-grade trust: AI guardrails, built-in governance, and continuous validation ensure autonomy is safe, reliable, and audit-ready.
And the results speak for themselves:
Cut MTTR by at least 75% with autonomous triage, enrichment, and case resolution
Automate 90%+ of Tier-1 tasks, eliminating the repetitive tasks that burn out analysts
10× faster response times across critical use cases like phishing, credential compromise, and malware investigations
80%+ reduction in alert fatigue, enabling analysts to focus on higher-value threat hunting and detection engineering
50% decrease in average cost per incident through Hyperautomation
4× more alerts handled with the same size team
35% reduction in the probability of a major breach
“Torq HyperSOC offers unprecedented protection and drives extraordinary efficiency for [our company] and our customers.”
The verdict: The future of SecOps automation belongs to platforms that deliver SOC autonomy at scale. Torq HyperSOC™ is the only platform built to unify the SOC, automate at enterprise scale, and deliver autonomy with the governance and trust today’s leaders demand. That’s why customers, MSSPs, and analysts agree: Torq is setting the pace for the modern autonomous SOC.
Get your copy of the GigaOm SecOps Automation Radar now.
Hyperautomation has become the new standard for modern organizations that want to move faster, work smarter, and operate at scale.
By combining AI, orchestration, and low-code technologies, Hyperautomation enables teams to automate complex business and IT operations end-to-end — including those that previously required human judgment. For security operations, this means faster detection, smarter response, and a foundation for autonomous defense.
Hyperautomation Explained: What It Means for Businesses
So, what is Hyperautomation? It’s a strategic business approach that unifies multiple automation technologies to streamline and speed up complex processes end-to-end. While traditional automation focuses on repetitive, rules-based tasks, Hyperautomation layers in intelligence, adaptability, and orchestration for machine-speed efficiency.
It connects systems, learns from data, and adapts dynamically to changing conditions — allowing businesses and security teams to achieve true operational agility through advanced technologies like artificial intelligence and robotic process automation (RPA).
At a glance, automation and Hyperautomation sound similar, but they solve very different problems in cybersecurity. Traditional automation handles simple, repetitive tasks. Hyperautomation spans systems, layers in AI-driven decision-making, and coordinates human-machine collaboration at scale. It’s about full lifecycle automation — detection, triage, enrichment, response, and resolution — across multiple domains.
In cybersecurity, this means moving beyond automating password resets or phishing reports. Hyperautomation empowers your security operations center (SOC) to autonomously detect threats, prioritize alerts, trigger tailored responses, and continuously optimize based on results.
Automation
Hyperautomation
Automates individual, repetitive tasks
Automates entire processes end-to-end
Script-based, static workflows
Dynamic, adaptive, and AI-driven workflows
Limited to known rules
Learns and evolves from data and context
Requires human oversight
Enables human-on-the-loop operation
Improves efficiency
Transforms scale, speed, and intelligence
How Hyperautomation Tools and Platforms Work: A Step-by-Step Guide
Hyperautomation isn’t one tool — it’s a coordinated ecosystem. It connects multiple Hyperautomation technologies into a single framework, typically combining:
GenAI and agentic AIfor decision-making and contextual awareness
Analytics and reporting tools for measuring performance and optimizing automations over time
Hyperautomation can adapt — systems can dynamically adjust workflows, update rules based on new data, and seamlessly coordinate human and machine collaboration.
Here’s how a typical Hyperautomation platform functions:
Data capture and integration: The system collects data from multiple sources, including SIEM, cloud infrastructure, and endpoint telemetry, to create a unified data foundation.
Orchestration: Hyperautomation maps workflows and identifies opportunities for intelligent orchestration.
AI: AI models analyze data, make predictions, and recommend actions.
Automation and execution: Low-code/no-code tools and bots execute complex tasks instantly — from case management to threat containment.
Monitoring and optimization: Real-time analytics and feedback loops allow continuous process refinement and performance tracking.
The Advantages of Hyperautomation
Hyperautomation technology transforms SecOps by delivering faster, smarter, and more scalable operations. Here’s a quick look at the biggest Hyperautomation benefits:
Ease of use: With drag-and-drop interfaces and no coding required, anyone on the security team can create powerful automations in minutes. Complex threat responses become easy to build, deploy, and scale across teams without relying on the complexity of legacy SOAR solutions or waiting for custom coding.
Lower costs: Dedicated expert support with no surprise consulting fees.
Flexible, full-stack automation: Integrate and automate anything across cloud, infrastructure, and on-prem systems.
Hyperautomation tools transform static operations into adaptive systems that learn, automate, and evolve — creating measurable efficiency across every layer of the enterprise.
From Automation to Hyperautomation
Security automation started with promise — but hit its limits fast. Legacy SOAR tools were designed to orchestrate basic security actions but broke down under the weight of modern security demands. Static playbooks, brittle integrations, and clunky interfaces turned what was supposed to be “automation” into yet another bottleneck.
Security teams needed a new way forward as threats grew faster, more dynamic, and more complex. Unlike SOAR, Hyperautomation doesn’t just automate a few steps; it transforms the entire SOC workflow.
It connects tools across your technology stack, enables context-aware decisions, and executes actions quickly. And because it’s built with low-code/no-code at its core, it empowers any analyst, not just engineers, to build, test, and deploy workflows in minutes.
Where SOAR failed to scale, Hyperautomation moves 10x faster with infinite extensibility, seamless integrations, and case management to reduce noise and prioritize what matters. It enables SOCs to go from “human-in-the-loop” to “human-on-the-loop,” directing strategy while AI and automation handle the grind.
When paired with agentic AI, Hyperautomation becomes the foundation of the autonomous SOC, which is a SOC where alerts are triaged, threats are hunted, incidents are remediated, and analysts stay focused on the big picture.
Hyperautomation Use Cases in Cybersecurity and IT Operations
Hyperautomation doesn’t just make your SOC more efficient — it can transform how your team works. Here are some ways where Hyperautomation delivers major impact for cybersecurity teams.
1. Incident Response
Traditional incident response is a manual slog. When an alert fires, analysts pivot between consoles to gather context, manually correlate data across systems, document findings, escalate through tickets, and execute containment steps one by one. The average organization takes over 200 days to identify and contain a breach… and most of that time is spent on tasks that could be automated.
Hyperautomation enables end-to-end incident response without human bottlenecks. From initial detection and triage to investigation, enrichment, and remediation, intelligent SOC automation accelerates every phase of the process. When an alert triggers, Hyperautomation automatically enriches it with asset context, user identity, threat intelligence, and historical data. It correlates related events across SIEM, EDR, and cloud platforms. It executes containment actions — isolating endpoints, revoking credentials, blocking malicious IPs — in seconds rather than hours.
Organizations using Torq Hyperautomation consistently report 60-95% reductions in MTTR, with response times dropping from hours to minutes. Kenvue achieved 89% case automation within six months and reduced MTTR by 60% in the first two months. The shift from reactive firefighting to automated response fundamentally changes what SOC teams can accomplish.
2. Phishing Response
Phishing is a top entry point for attackers — and it’s getting worse. AI-generated phishing makes attacks harder to spot, while the volume of reported suspicious emails overwhelms analyst capacity. Manual triage creates dangerous delays: by the time an analyst investigates a report, extracts indicators, checks threat intel, scans the recipient’s endpoint, and resets credentials, attackers have already moved laterally.
Hyperautomation triggers the moment email security flags a suspicious message or a user reports a potential phish. Within seconds, the workflow executes automatically: the email is quarantined across all affected inboxes, threat intelligence enriches the alert with context on the sender domain and known campaigns, EDR scans the recipient’s endpoint for malicious payloads, IAM resets compromised credentials and enforces step-up authentication, SIEM logs the entire incident chain, and the user receives notification explaining what happened and what actions were taken.
Total response time drops from 45+ minutes (best case for manual triage) to under 60 seconds. Analyst involvement: zero for Tier-1 resolution, with escalation only when anomalies require human judgment.
3. Just-in-Time (JIT) Access Provisioning
Managing administrative privileges across hybrid infrastructure creates a constant tension between security and productivity. Manual approval workflows slow down legitimate access requests, frustrating users and delaying critical work. Meanwhile, standing privileges accumulate — access granted for one-time projects never gets revoked, creating privilege creep that expands the attack surface. Most organizations have no visibility into who has access to what, or why.
Hyperautomation grants and revokes access dynamically based on workflows, business rules, and time-based policies. When a user requests elevated privileges, the workflow automatically routes to appropriate approvers based on system sensitivity and requester role. Once approved, access is granted immediately and automatically expires at the end of the defined window. Every request, approval, and revocation logs for compliance. For routine access patterns, Hyperautomation can approve requests automatically based on predefined criteria, eliminating wait times entirely.
As a result, access provisioning drops from days to minutes. Standing privileges are eliminated for sensitive systems — access exists only when actively needed. Audit trails satisfy compliance requirements without manual documentation. Security posture improves by reducing the attack surface, while user experience improves through faster, more predictable access workflows.
4. Threat Hunting
Effective threat hunting requires proactively searching for indicators of compromise across massive datasets: SIEM logs, EDR telemetry, identity events, cloud activity, and more. But most SOC teams are so buried in reactive alert triage that they never get to proactive hunting. When they do, the manual process of querying multiple systems, correlating results, and investigating anomalies consumes hours that analysts don’t have.
Hyperautomation enables continuous, automated threat hunting using AI Agents that query across SIEMs, EDRs, identity platforms, and cloud infrastructure simultaneously. These agents search for known indicators of compromise, detect anomalous behaviour patterns, and surface suspicious activity that wouldn’t trigger traditional alert thresholds. When potential threats are identified, Hyperautomation automatically enriches findings with context, correlates related events, and either remediates automatically or escalates to analysts with full investigation context already assembled.
Threat hunting shifts to a continuous, automated capability. SOCs detect threats that would otherwise go unnoticed — subtle indicators hiding below alert thresholds, slow-moving attacks designed to evade detection, and anomalies that only become apparent when correlated across systems. Analysts who previously spent their time on manual triage can now focus on investigating the high-value findings that automated hunting surfaces.
5. Identity and Access Management (IAM)
Identity has become the most critical security layer — 88% of breaches involve compromised credentials. But managing identity workflows at scale is operationally painful. Onboarding requires provisioning access across dozens of systems. Offboarding leaves orphaned accounts that become attack vectors. Access reviews are manual, time-consuming, and often ignored. Self-service requests create tickets that sit in queues while users wait.
Hyperautomation brings control and consistency to identity workflows across the entire lifecycle. During onboarding, new employees are automatically provisioned with role-appropriate access across all required systems based on job function and department. Self-service access requests route through automated approval workflows, with AI validating requests against policy before granting. Periodic access reviews trigger automatically, with Hyperautomation identifying anomalous access patterns and flagging accounts for review. During offboarding, account deprovisioning executes immediately across all connected systems.
Access reviews that previously took weeks of manual effort complete automatically with analyst attention only where needed. Self-service requests resolve in minutes instead of days. The entire identity posture becomes auditable, consistent, and aligned with policy, without adding complexity to already-stretched security teams.
Hyperautomation with Torq: How to Get Started
Torq Hyperautomation™ combines agentic AI, low-code/no-code workflow building, and multi-system security orchestration into one unified experience. Whether you’re deploying across cloud, on-prem, or hybrid environments, Torq makes it easy to automate your entire SOC — without needing a single line of code.
Key benefits of Hyperautomating your security operations with the Torq platform include:
AI-native: Orchestrate AI Agents that triage, investigate, and remediate alerts.
No-code/low-code simplicity: Use drag-and-drop or natural language prompts to build advanced workflows in minutes.
Massive integration library: Connect with any tool in your security stack and beyond.
Case management: Prioritize and enrich alerts automatically, route decisions to the right people, and track everything.
As threats grow faster, more complex, and more automated, your response strategy has to evolve just as quickly. Whether you’re replacing legacy SOAR, reducing alert fatigue, or scaling your SOC, Torq’s Hyperautomation platform gives you the speed, intelligence, and flexibility to stay ahead.
Feeling the pressure to get more done faster across your security operations?
Hyperautomation is an advanced business strategy that uses AI (artificial intelligence)and robotic process automation (RPA) to automate complex business processes end-to-end. Unlike standard automation tools that focus on repetitive, manual tasks, Hyperautomation orchestrates entire workflows across multiple systems — from data analysis and decision-making to execution.
It combines advanced technologies like natural language processing (NLP), process mining, and business process management (BPM) to help organizations improve efficiency, reduce human error, and accelerate digital transformation.
How is Hyperautomation different from SOAR?
SOAR (Security Orchestration, Automation, and Response) promised to automate security operations but consistently failed to deliver. Legacy SOAR tools suffer from three core problems: they require specialised skills and costly professional services to implement, they rely on brittle playbooks that break when environments change, and they take months to integrate new tools.
Hyperautomation addresses each of these failures. It’s accessible through drag-and-drop interfaces and natural language — anyone on the security team can build workflows, not just engineers. It uses AI-driven orchestration that adapts dynamically instead of static playbooks. It integrates with any tool in days through pre-built connectors and AI-generated integrations. Where SOAR automates a few steps, Hyperautomation transforms the entire SOC workflow. Where SOAR requires human-in-the-loop for every decision, Hyperautomation enables human-on-the-loop operation at machine speed.
What technologies are used in Hyperautomation?
Hyperautomation relies on an ecosystem of automation technologies that work together to create intelligent, self-improving systems. These include:
Artificial intelligence (AI) for contextual understanding and decision-making
Robotic process automation (RPA) for executing repetitive, rule-based actions
Business process management (BPM) for orchestrating and optimizing workflows
Process mining to discover and map inefficiencies in existing processes
Natural language processing (NLP) to interpret and process unstructured data such as emails or documents
Automation platforms that unify bots, analytics, and human oversight in one environment
Together, these tools turn fragmented automation into cohesive, intelligent, and automated processes.
How does Hyperautomation improve business efficiency?
Hyperautomation improves efficiency across multiple dimensions. It eliminates manual, repetitive tasks that consume analyst time — organizations using Torq report automating 89-100% of Tier-1 cases. It accelerates response times from hours to seconds by executing workflows at machine speed. It reduces errors by applying consistent, auditable processes to every incident. It scales capacity without adding headcount — teams handle 3-5x more alerts with existing staff. And it frees skilled analysts to focus on high-value strategic work like threat hunting instead of copying data between consoles. The compound effect is a fundamental transformation in what security teams can achieve.
What are the benefits of implementing Hyperautomation?
The benefits of Hyperautomation extend across efficiency, intelligence, and scalability:
Speed: Response times drop from hours to minutes or seconds
Scale: Handle dramatically more alerts without adding headcount
Consistency: Every incident follows the same proven process
Accuracy: AI-driven decisions reduce human error
Cost reduction: Eliminate expensive professional services and reduce operational overhead
Analyst retention: Remove tedious work that causes burnout and attrition
Compliance: Automatic logging and audit trails satisfy regulatory requirements
Adaptability: AI-driven workflows evolve with changing threats
Integration: Connect any tool in your stack without months of custom development
How does Hyperautomation support digital transformation?
Hyperautomation is a cornerstone of digital transformation because it enables continuous innovation across every layer of the business. By integrating AI, RPA, BPM, and process mining, it transforms static operations into agile, intelligent automation ecosystems.
Organizations can scale processes faster, reduce costs, and empower employees with tools that amplify human capability — all while achieving measurable improvements in efficiency, compliance, and customer experience.
Chris Coburn is the Senior Director of Technology Alliances at Torq, where he leads strategic partnerships that fuel innovation and growth. With experience scaling alliance programs at cybersecurity leaders like Recorded Future, he brings an execution-first mindset to ecosystem development. He’s the architect of Torq’s AMP program, redefining how partners integrate, collaborate, and win together.
Cybersecurity vendors: Your customers already have a stack they trust — your job (and ours) is to make it smarter, faster, and more connected. Torq is the automated security solution that plugs into anything, orchestrates everything, and turns alerts into action across the SOC.
Through the Torq AMP (Alliance & Momentum Partner) Program, we co-build practical solutions so our integration partners’ products shine inside live customer workflows. The AMP’d Sessions video series brings these integrations to life — showing how Torq and our partners turn big promises into real-world SOC outcomes.
Security teams are overwhelmed — on average, they have 83 tools and 29 vendors, and no time to tie it all together. Torq is the execution layer that makes the whole stack work as one.
Integrates with anything.300+ out-of-the-box connectors plus universal HTTP/webhooks, headless APIs, custom actions, and on-prem support.
Operational in days, not months. Visual no-code builder and BYO-integration framework.
Proves impact fast. Prebuilt use cases across SIEM, EDR, IAM, cloud, and threat intelligence reduce MTTR, cut manual work, and showcase real interoperability.
Co-build, co-sell, co-market. Joint solution playbooks, launch kits, and customer deployment resources that demonstrate value on day one.
Measurable outcomes. Customers report halved MTTD, ~90% of responses automated, 3–5x alert throughput, and up to 90% of T1/T2 tickets closed automatically.
How We Integrate
Prebuilt connectors for SIEM, EDR/XDR, IAM, email security, cloud, threat intelligence, ITSM, data stores, and more.
Universal HTTP/webhook steps to call any REST API, receive events, and normalize responses.
Custom integration builder to define auth, actions, and outputs in minutes (no waiting on a new connector).
Headless APIs for embedding automation behind your UI, exposing “one-click” actions inside your product.
ChatOps and Interact to run workflows from Slack/Teams or secure web forms for human-in-the-loop steps.
Hybrid and on-prem options to operate wherever your customers do — cloud, datacenter, or air-gapped.
AMP Partner Spotlights: Better Together
Torq is trusted by security teams across various industries, including finance, technology, consumer goods, fashion, hospitality, and more. Here’s how Torq works with the best in the business to deliver exceptional SecOps outcomes. You can also watch demos on how these integrations work here.
Torq + Intezer: Agent-to-Agent Collaboration
Torq and Intezer partner to deliver forensic-grade agentic alert triage and autonomous threat remediation — enabling customers to build an autonomous SOC that can handle massive alert volumes, eliminate alert fatigue, and prevent analyst burnout. With Intezer AI agents triaging and analyzing events in seconds, and Torq’s AI SOC Analyst, Socrates, auto-remediating over 95% of Tier-1 and Tier-2 security alerts, these agents work together like a seasoned SOC team, leaving humans to focus on critical threats.
Torq + Wiz: Cloud Threat Intelligence in Action
When Wiz detects a cloud security issue, like an exposed S3 bucket, dormant IAM credential, or misconfiguration, it can trigger a Torq workflow. Inside Torq, prebuilt Wiz steps let you list, query, and update findings, then fix issues automatically or with quick approvals: disable risky users, tighten access, enable versioning, and notify owners in Slack or Teams. Torq adds MITRE ATT&CK tags, AI summaries from Socrates, our AI SOC analyst, and full case management so cloud issues turn into clean, documented fixes.
Torq + Zscaler: Enforce and Respond in Real Time
Torq integrates seamlessly with Zscaler to automate cloud security enforcement and incident response. When Zscaler detects risky web traffic, policy violations, or malicious file downloads, alerts can flow directly into Torq.
Torq enriches it with context from threat intelligence, IAM, and endpoint tools and then acts in real time: blocking destinations, disabling compromised accounts, notifying users, and creating ITSM tickets. Together, Zscaler and Torq cut MTTR, keep policies consistent across devices, and lighten the load on your analysts.
Torq + Cyera: Auto-Remediate Data Risk
Joint customers can ingest Cyera detection events into Torq via webhook triggers and then enrich or act upon them with dedicated Cyera workflow steps, like retrieving classifications or datastore details, using API key authentication.
In practice, this means that when Cyera detects a data risk — say, a public-facing S3 bucket or a misconfigured access policy — Torq can immediately launch a tailored auto-remediation workflow. Whether revoking access, closing exposures, or notifying stakeholders, Torq executes those actions autonomously and at machine speed.
Torq + Panther: Cloud Detection and Response
Panther streams high-fidelity alerts from AWS, GCP, Azure, and SaaS apps into Torq. Torq enriches each alert with threat intel, identity, and asset context, then automates next steps such as isolating endpoints, rolling back permissions, pinging Slack/Teams, or creating ITSM tickets. The result is lower MTTR, less manual work, and consistent response across multi-cloud environments.
Torq + Reco: Automate SaaS Risk
Torq and Reco integrate to deliver smarter SaaS security by connecting Reco’s visibility into user activity and data sharing with Torq’s Hyperautomation engine. When Reco detects risky SaaS behaviors — such as overshared files, sensitive data exposure, or suspicious user actions — those alerts flow directly into Torq workflows.
Torq enriches each event with IAM, threat intel, and business context, then orchestrates the right response, from revoking sharing permissions to disabling compromised accounts or notifying stakeholders in Slack, Teams, or Jira. Reco and Torq enable SOC teams to quickly mitigate SaaS risks, enforce governance policies automatically, and cut down the manual work that slows SaaS security operations.
You’re not just another logo on a page for us. Here’s what you get with Torq AMP:
Ready-to-ship blueprints: Production-ready playbooks that make your product shine inside real SOC workflows.
Fast-track integration: Your own Torq instance, hands-on SE support, and a clean path from concept to live integration without red tape.
Go-to-market that actually goes somewhere: Joint demos, field events, aligned sales plays, and enablement.
Marketplace momentum: Front-and-center placement, discoverable listings, and packaged use cases that customers can deploy in minutes.
Proof that sells: Built-in telemetry and dashboards that quantify MTTR reduction, auto-resolved cases, and analyst hours saved/
Marketing with muscle: Tap the Torq brand — social, campaigns, solution briefs, in-product exposure, and (yes) custom swag to light up launches.
Not Just Another Solution. The Solution That Makes Every Other One Better.
Torq doesn’t replace your product or your customers’ investments. It amplifies them. If you want your cybersecurity solution to do more inside the SOC — automatically — Torq is the automated security solution that makes your security product (and your customers’ entire stack) shine.
Watch The AMP’d Sessions video series to see how Torq and partners like Intezer, Wiz, Zscaler, Cyera, Panther, and Reco are solving real SecOps challenges in 15 minutes or less.
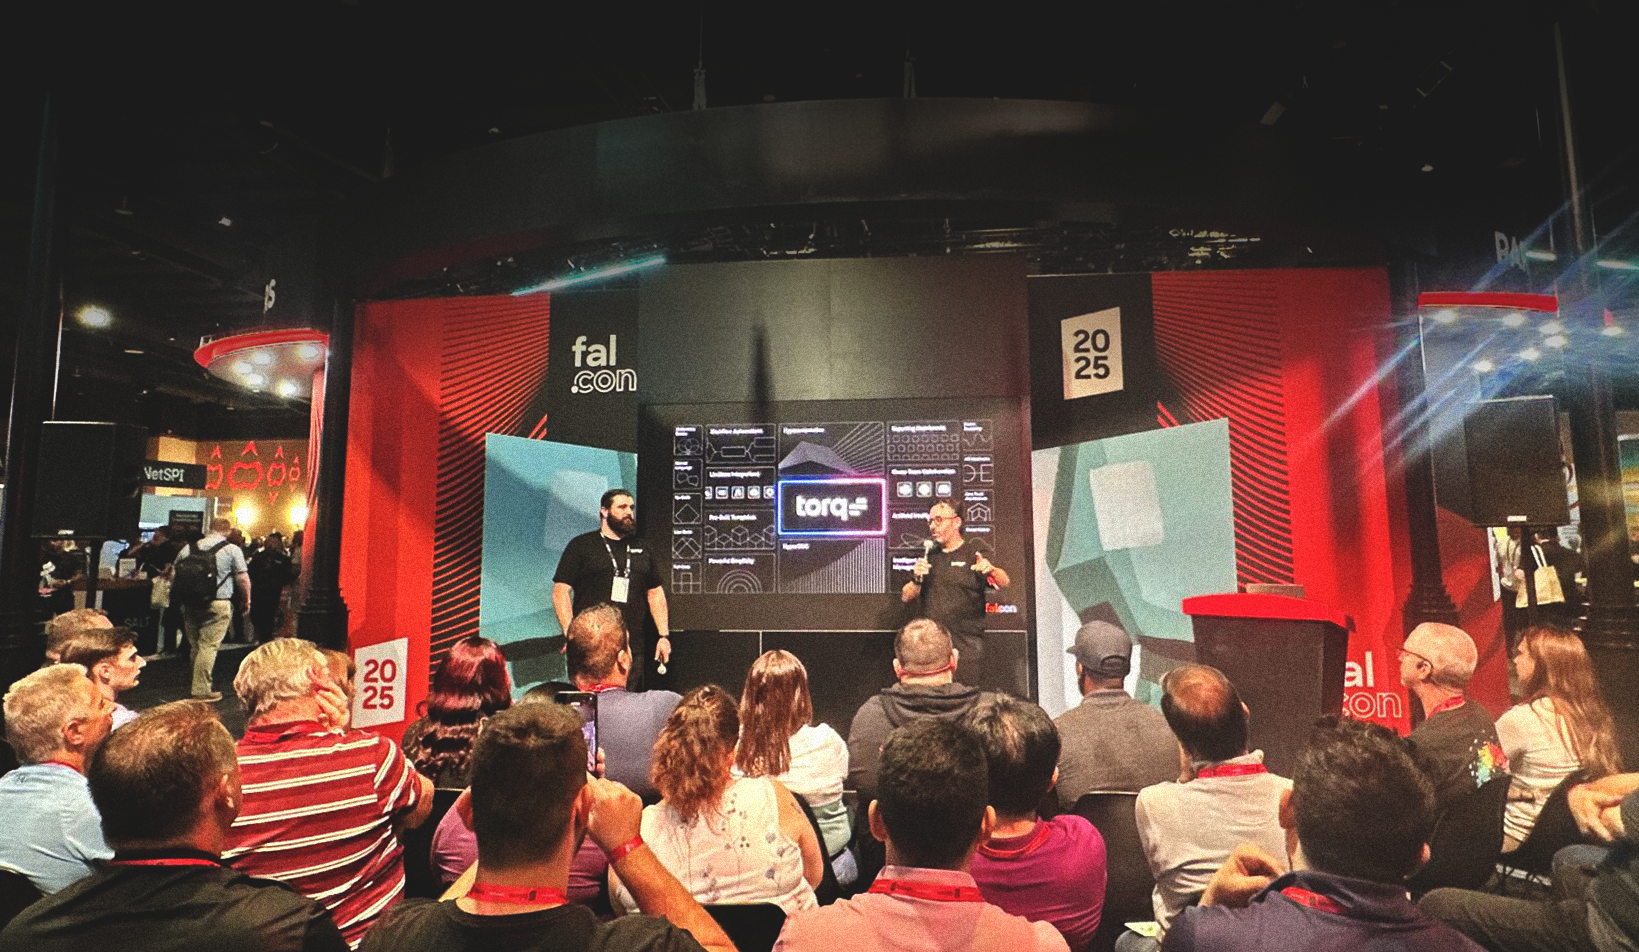
The energy at Fal.Con 2025 was undeniable. Conversations weren’t about if AI belongs in the SOC — they were about how fast teams can adopt it, govern it, and get value fast. And across the Hub Expo floor, SOC leaders we talked to were blunt: Legacy SOAR is dead. The future is agentic AI and Hyperautomation, and it’s happening now.
The Current SOC Model is Cracking
SOCs are drowning under the weight of alerts, manual triage, and analyst churn. With thousands of alerts per day and too few analysts to investigate them, it’s no surprise so many threats slip through the cracks.
Legacy SOAR platforms like XSOAR aren’t helping — they’re holding security teams back. Monolithic, slow, and code-heavy, they trap analysts in brittle playbooks and endless swivel-chair work.
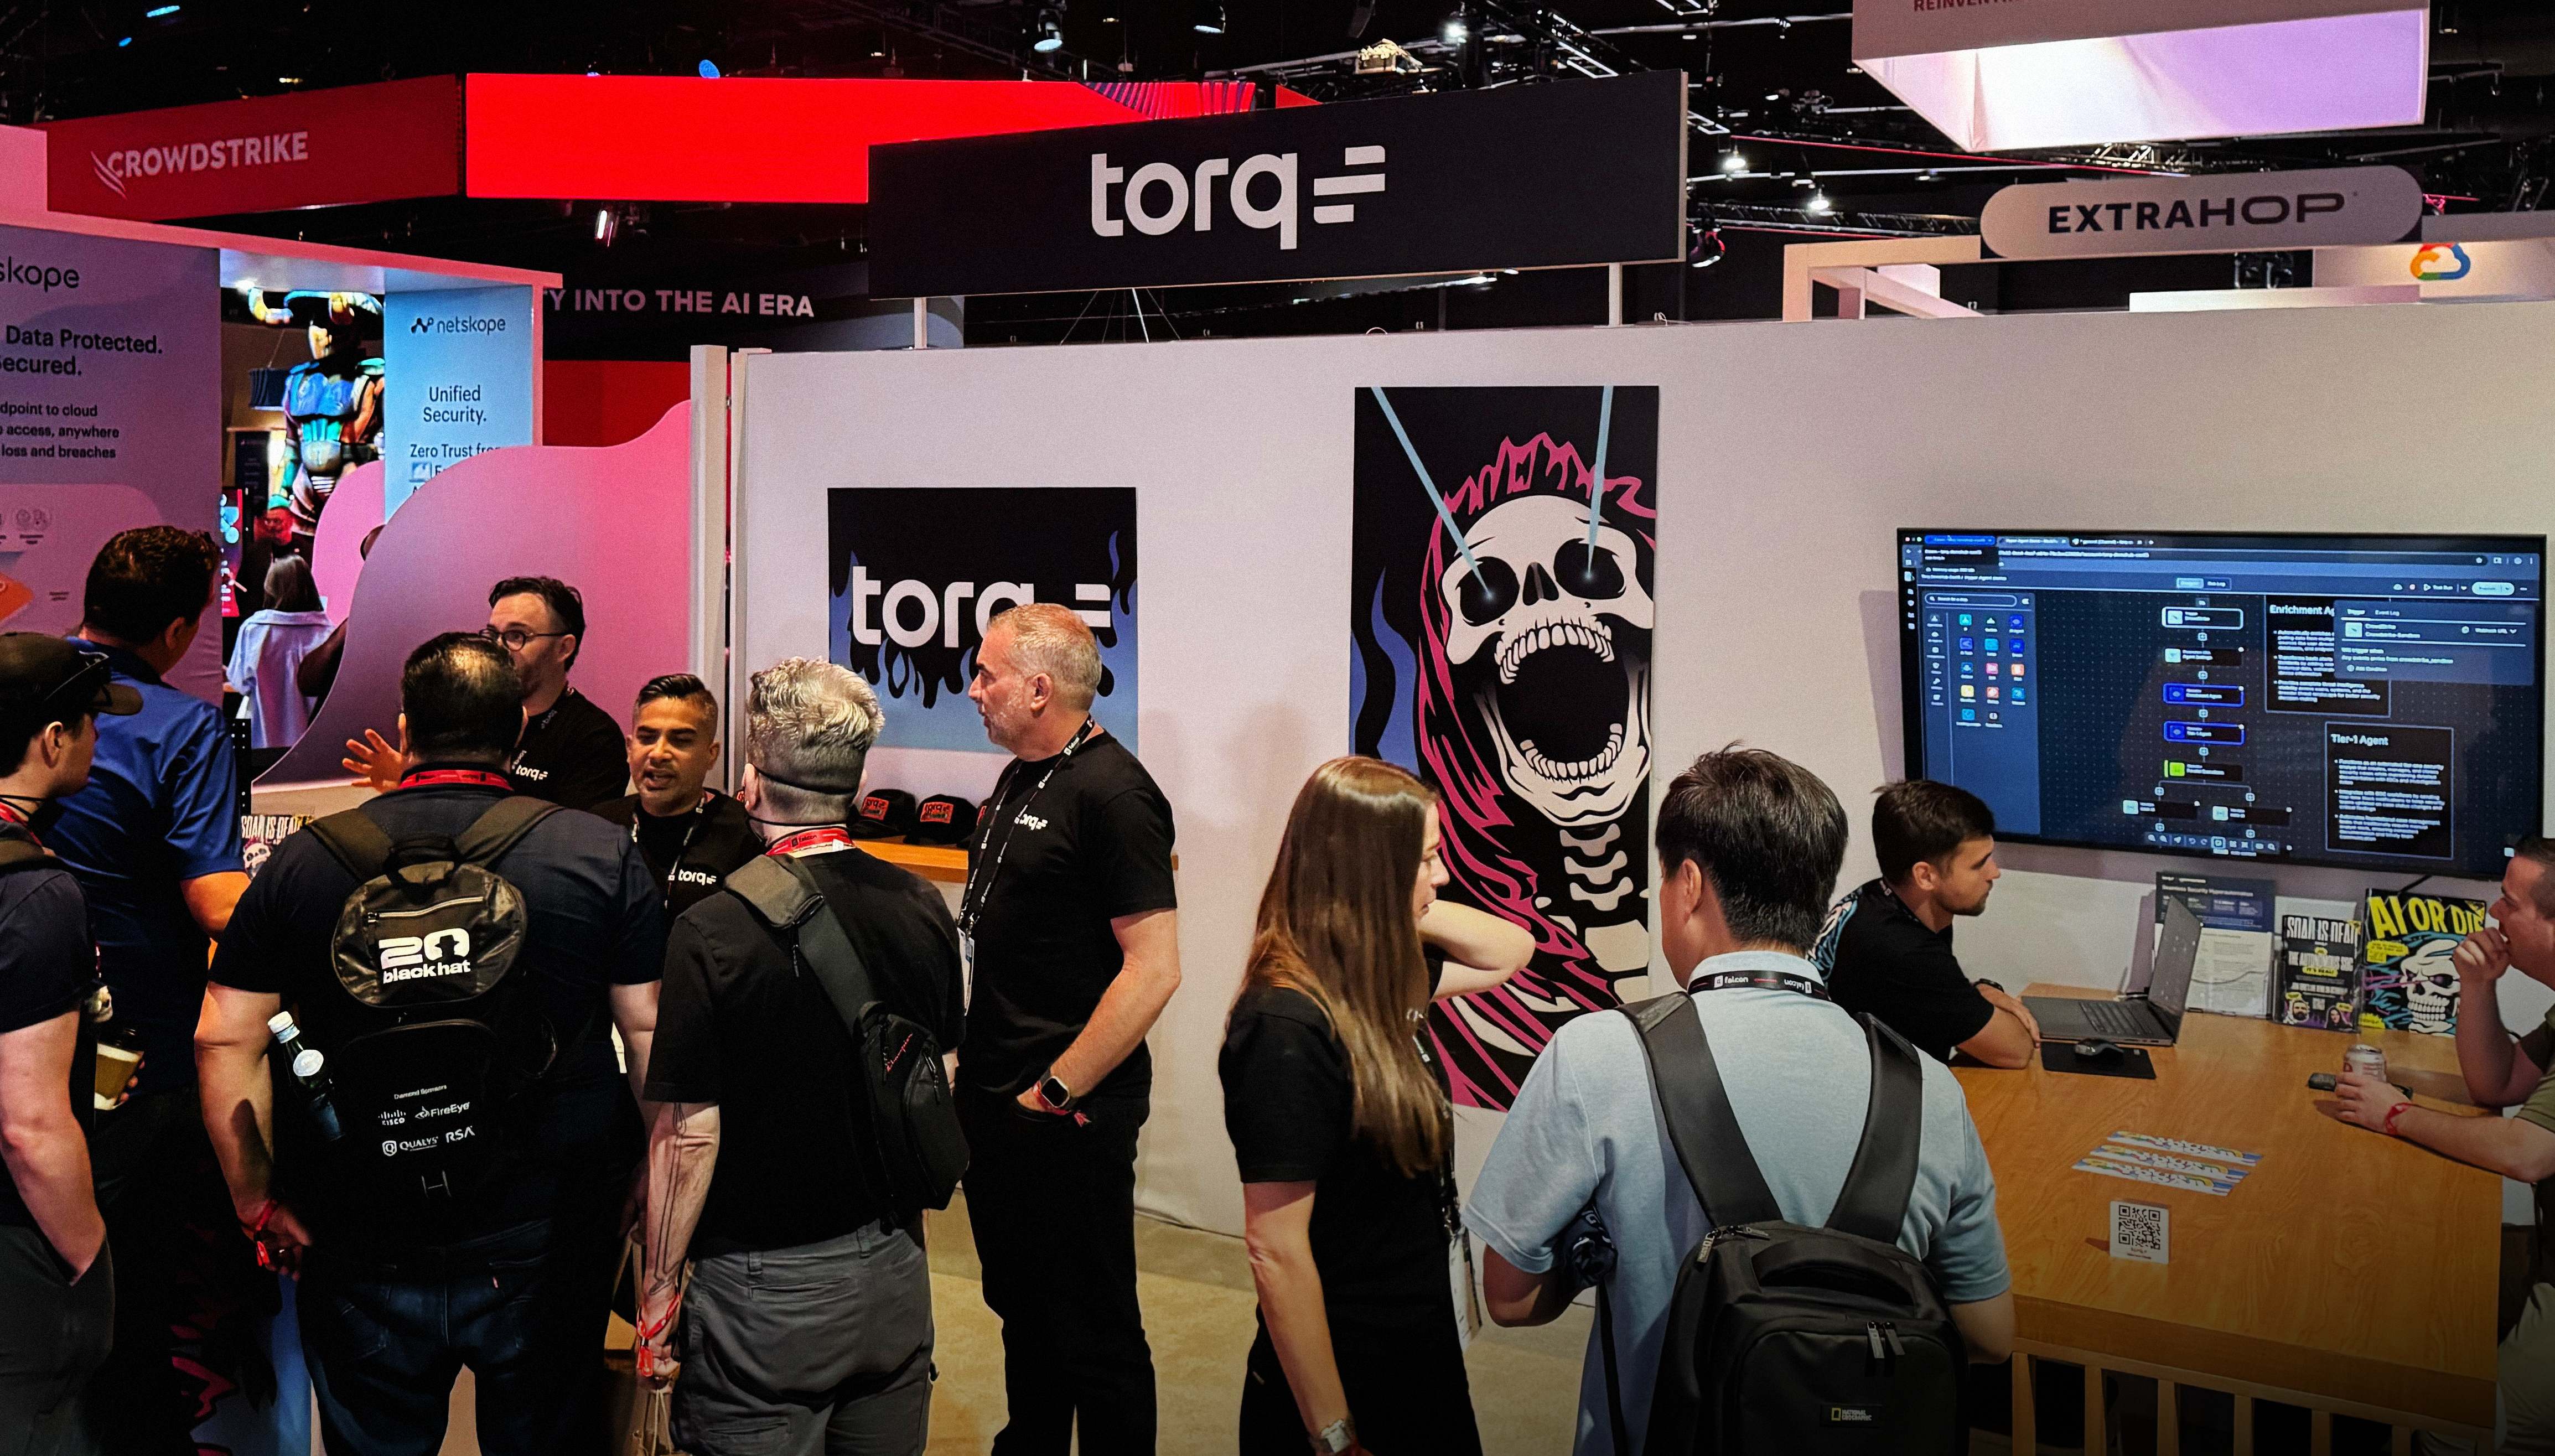
That’s why so many conversations at Fal.Con 2025 gravitated toward the joint value of Torq Hyperautomation™ and CrowdStrike Falcon. Together, they’re giving SOC teams what legacy SOAR never could: automation at scale, real-time intelligence, and a foundation for truly autonomous security operations.
What Everyone Was Talking About at Fal.Con 2025
AI or die. SOC leaders agreed: Adversaries have AI, so SOCs need AI just to survive. With Torq + CrowdStrike, AI agents and automated workflows already cut Tier-1 work by over 95%, proving autonomy isn’t a future dream; it’s a reality in production at Fortune 500s.
Bridging SecOps + IT. Conversations weren’t about Torq versus CrowdStrike, but about how the two together unify security and IT operations into a seamless, coordinated defense. Falcon Fusion provides real-time data aggregation and automation within the CrowdStrike ecosystem; Torq orchestrates it into automated case lifecycles that span broader Hyperautomated use cases across both IT and security domains.
Agentic AI in practice. SOC leaders weren’t looking for another dashboard. They wanted AI that helps analysts cut through noise and focus on real threats. With Socrates, Torq’s AI SOC Analyst, enriched CrowdStrike detections become fully triaged cases, escalated only when human judgment is needed.
Multi-SIEM strategy. With many security teams migrating log aggregation to CrowdStrike Fusion, analysts are searching for a way to adhere to data retention compliance policies while maintaining a way to take action on logs stored in multiple data lakes. Torq becomes the solution to the multi-SIEM challenge, sitting at the center of disconnected data lakes to automatically query, correlate, and streamline data management across the entire environment.
Live from the Fal.Con Theater: AI or Die
One of the highlights of Fal.Con 2025 was our standing room-only theater session, “Achieving the Autonomous SOC with AI Agents,” led by Chris Coburn, Torq’s Sr. Director of Tech Alliances. and myself. The message hit home: adversaries have AI — SOCs can’t afford to stay manual.
Key takeaways:
AI agents are the next frontier. Gartner projects that AI will increase SOC efficiency by 40% by 2026, and Torq Socrates is already proving that today.
Agentic reasoning is key to building trust. Torq’s AI agents provide clear, immutable agentic execution logs, giving security leaders trust in the decision making and autonomous actions of AI.
Autonomy is real.IDC validated that Torq HyperSOC™ enables SOC teams to cut investigation time by up to 90% and handle 3–5× more cases without adding headcount.
From burnout to resilience. Agentic AI reduces alert fatigue, eliminates Tier-1 grunt work, and empowers analysts to focus on higher-value investigations.
The audience agreed. SOC leaders don’t want more dashboards or point tools. They want a path to SOC autonomy that’s proven, practical, and safe to deploy at scale — and Torq + Crowdstrike deliver that blueprint.
Torq + CrowdStrike: Better Together
Torq Hyperautomation™ and CrowdStrike Falcon are the new foundation for autonomous SecOps. Together, they deliver:
Seamless integration. Day-one automation across Falcon detections, incident response, and vulnerability management.
Built for scale. Multi-tenant support for MSSPs and elastic performance for enterprise SOCs.
AI-driven autonomy. Socrates (Torq’s AI SOC Analyst) and Falcon Fusion power real-time triage, enrichment, and auto-remediation.
11.5 million Torq + CrowdStrike automated actions every year across 150+ organizations
See Torq in Action
Fal.Con 2025 made it clear: the SOC model is shifting — from manual dashboards and legacy SOAR to agentic AI and Hyperautomation. Torq + CrowdStrike are already powering autonomous SecOps at scale, from enterprises to MSSPs.
Join our team for a live demo to see how your SOC can cut MTTR by 75% in under 90 days.
In just 90 days with Torq, security teams move from reactive to proactive — automating Tier-1 triage, accelerating response, and freeing analysts to focus on what matters most.
The 90-Day Path to SOCAutonomy
30 Days: Kickoff, Connect, and Ship Quick Wins
In the first 30 days with Torq, the focus is on standing up the platform, connecting your stack, and shipping quick wins. Guided by a dedicated Torq team, your SOC enables SSO and role mapping, lights up core integrations like M365/Defender, Okta/Entra, CrowdStrike, Slack, Jira, AWS, etc, and launches the first workflows — phishing triage, EDR alert handling, or cloud misconfiguration detection.
During this phase, your builders are also trained on workflow design, testing, and debugging. By the end of the first month, automations are live, Tier-1 alert noise is already dropping, and analysts are reclaiming hours once lost to swivel-chair triage.
60 Days: Scale Coverage, Standardize, and Measure
In the next thirty days, the focus shifts to scaling and simplifying. A second wave of workflows expands coverage into IAM offboarding, IOC enrichment, login anomaly detection, and user behavior signals. Socrates,Torq’s AI SOC Analyst, is deployed to handle Tier-1 triage, enrichment, and case summaries.
Teams tune thresholds, implement deduplication and correlation rules, and adopt modular subflows and templates to accelerate workflow reuse — especially valuable for MSSPs managing multiple tenants. Automation KPIs like MTTR, suppression rate, and analyst touches per case are established to measure impact. At this stage, broader automation coverage reduces false positives, alert fatigue decreases, and builders independently ship new workflows.
90 Days: Autonomous with Humans on the Loop
By the end of three months, your SOC begins operating as an autonomous system with human-in-the-loop guardrails. Socrates orchestrates the entire case management lifecycle from ingestion through enrichment, correlation, decision, response, and documentation. Analysts only step in for escalated incidents. Standard operating procedures and runbooks are finalized, intake and closure criteria are standardized, and before-and-after benchmarking is completed to prepare for the first quarterly business review (QBR).
The outcomes are transformative: up to 90% of Tier-1 alerts are automated end-to-end, MTTR drops by more than 60% on core use cases, and analysts shift from reactive case handling to proactive oversight, threat hunting, and strategic improvements.
What to Measure in the First 90 Days of Your AI SOC
Adopting Torq isn’t just about improving detection and response; it’s about proving measurable business impact within the first 90 days. Here are the key metrics to track:
MTTR/MTTI: Compare before-and-after times across common use cases to demonstrate immediate efficiency gains.
Automation coverage: Track the percentage of Tier-1 alerts that Torq fully handles end-to-end. Mature customers often see ~90% automation coverage by day 90.
Suppression rate: Measure how many false positives are automatically identified, documented, and closed with retained evidence — cutting analyst workload and improving accuracy.
Analyst touches per case: For Tier-1 incidents, the target is near-zero touches. Analysts should only step in for risk-gated actions or escalations.
Onboarding hours per tenant (MSSPs): For managed services, this is a critical margin lever. Track the reduction in time to first value when onboarding new customers.
Tool consolidation savings: Document scripts, point automations, and legacy SOAR licenses retired as Torq unifies orchestration into a single platform.
Audit readiness: With evidence generated automatically in real time, compliance prep shifts from weeks of manual effort to hours of reporting.
Torq ensures customers hit these ROI milestones with a dedicated team, JumpStart implementation accelerators, and the Torq Academy training program. Teams also have 24/7 access to the Torq Knowledge Base for self-service support. This combination of hands-on guidance and self-service enablement ensures both rapid adoption and long-term maturity.
90-Day Autonomous SOC Wins From Torq Customers
Valvoline: Saving Analysts 6–7 Hours a Day
When Valvoline’s security team faced major resource constraints during a corporate divestiture, they needed a platform that could help them do more with fewer analysts. Within just one week of deploying Torq, Valvoline was up and running on its top-priority use cases, including phishing response and EDR alert handling.
Torq’s no-code workflows immediately cut down on repetitive triage work, saving analysts between six and seven hours every single day. A Rapid7 integration that had stalled for months under their legacy SOAR was delivered in just days with Torq, proving the platform’s ability to integrate seamlessly and deliver value fast.
Global Health and Wellness Company: Proving SOC Value with Data in 60 Days
A global health and wellness company needed a way to bring visibility and maturity to its in-house SOC. With Torq, they stood up full end-to-end case management in just six weeks, consolidating data across SIEM, cloud, and identity tools. Within two months, the team had automated 89% of cases and reduced MTTR by 60%.
Beyond efficiency gains, Torq’s case taxonomy and structured workflows gave this organization the ability to present clear, data-driven ROI narratives to executives, transforming the SOC from a reactive cost center into a proactive value generator.
HWG Sababa: Doubles SOC Output Without Adding Headcount
Italian MSSP HWG Sababa serves customers across Europe, the Middle East, and Central Asia. Before Torq, their analysts were drowning in manual Tier-1 tasks, struggling to meet customer SLAs without expanding headcount. By deploying Torq Hyperautomation™, HWG Sababa automated 55% of their monthly alerts within weeks. MTTR dropped by 95% for low- and medium-priority incidents and by 85% for high-priority threats.
This surge in security automation nearly doubled the SOC’s operational capacity, allowing analysts to focus on advanced investigations and strategic work while still delivering faster, more consistent outcomes to customers.
Global Online Money Transfer Platform: Cuts Alert Handling Time by 30%
A leading financial services provider replaced its in-house threat management system with Torq Hyperautomation and saw immediate results. Within days, the team unified its entire security stack — AWS, Microsoft 365, Active Directory, SentinelOne, and more — into Torq’s platform.
The outcome: 30% time savings, 90%+ of alerts automatically investigated and remediated, and IAM tasks reduced from a full day of work to just three minutes. With enterprise-grade, multi-tenant architecture meeting strict regulatory demands, the company now scales security operations efficiently without adding headcount, all while maintaining compliance across global finance regulations.
Why Customers Ramp Up Fast with Torq HyperSOC
Agentic AI (Socrates): At the core of Torq HyperSOC™ is Socrates, our AI SOC Analyst, designed to handle the full case lifecycle for Tier-1 and Tier-2 incidents. Socrates automatically triages incoming alerts, enriches them with context from threat intelligence and internal data sources, documents every step, and even remediates routine cases without human intervention. By offloading repetitive triage and investigation tasks, Socrates drastically reduces MTTR while ensuring every action is logged, auditable, and defensible. Analysts are only engaged when higher-value judgment or escalations are required.
No-code/low-code and AI workflow builder: Torq empowers both analysts and engineers with a no-code/low-code and AI workflow builder, while still offering full-code capabilities for team members who want to go deep. Teams can design and deploy complex workflows in hours instead of weeks using a drag-and-drop canvas. Reusable subflows and golden templates accelerate scale, while audit-ready logging ensures every action is captured for compliance and accountability. This approach eliminates the need for scarce developer resources while allowing security teams to easily adapt and expand their automations as threats evolve.
300+ prebuilt integrations: Torq connects to virtually any tool in the modern SOC ecosystem, with hundreds of prebuilt integrations covering SIEM, EDR/XDR, IAM, cloud platforms, ITSM systems, email and chat, and threat intelligence sources. Torq offers containerized and custom connectors for niche or proprietary tools to ensure nothing is left out. This deep integration library makes Torq the connective tissue of your SOC, breaking down silos and ensuring every system can work together in real time.
Built for scale: Unlike legacy SOAR, Torq is designed for modern enterprise and MSSP scale. Its multi-tenant, event-driven architecture supports seamless onboarding across multiple environments without duplicating infrastructure. Workflows execute in parallel at massive scale, enabling real-time enrichment and response even in the face of thousands of daily alerts. Enterprise-grade role-based access control (RBAC) and single sign-on (SSO) provide the governance and security compliance needed to run automation at scale across complex organizations and managed service environments.
Get Your SOC Autonomous in 90 Days
If you’re building a modern SOC, you don’t need more dashboards — you need outcomes.
In 90 days, Torq HyperSOC turns “too many alerts, too little time” into a repeatable, autonomous system: ~90% of Tier-1 handled end-to-end, MTTR slashed, and analysts freed up for threat hunting and strategy. Socrates drives the case lifecycle, the no-code and AI workflow builder scales your best practices, and 300+ integrations make your entire stack work as one.
Stop fighting backlog with headcount. Start operationalizing automation with guardrails, evidence, and real ROI your leadership can see by the next business quarter.
For years, SIEM, SOAR, and XDR have defined enterprise security operations. Each played a critical role — SIEM aggregates and analyzes logs for visibility, SOAR automates repetitive tasks, and XDR expands detection across EDR, identity, and cloud-based environments. Yet even together, these platforms could not keep pace with the complexity, scale, and speed of today’s cybersecurity landscape.
That’s where Torq HyperSOCTM comes in. Rather than choosing between XDR + SOAR or XDR + SIEM, HyperSOC integrates detection, automation, workflow orchestration, and response in one unified platform.
What is XDR?
XDR (Extended Detection and Response) is the next evolution of endpoint detection — expanding visibility across the full attack surface: endpoints, network, identity, email, and cloud. It unifies telemetry from multiple layers of the security stack to detect, investigate, and respond to threats faster and with greater context.
Unlike traditional SOC tools that focus on one domain, XDR delivers:
Unified detection across multiple data sources, reducing silos and blind spots
Correlated insights that connect related alerts into a single incident view
Built-in response capabilities that can isolate hosts, block users, or terminate malicious processes automatically
In a modern SOC, XDR acts as the detection and investigation backbone. It’s where raw telemetry becomes actionable threat intelligence. But while XDR accelerates detection, it’s not a complete automation or case management system. It doesn’t orchestrate multi-tool workflows, enforce process consistency, or manage complex investigations at scale.
What is SIEM?
SIEM (Security Information and Event Management) was built for a world before cloud scale and real-time automation. It centralizes security data — collecting logs, normalizing events, and correlating alerts from across the environment.
For most enterprises, SIEM tools remain the system of record for:
Log management and retention for compliance and audits
Forensic investigations that require long-term data lookback
Correlation and reporting across endpoints, networks, and applications
While essential for visibility, SIEM wasn’t designed for real-time incident response. As infrastructures grow across hybrid and cloud-based environments, SIEMs often struggle with data volume, latency, and cost. They tell you what happened, but not what’s happening now — and certainly not how to stop it in time.
What is SOAR? (And Why It’s Dead)
SOAR (Security Orchestration, Automation, and Response) emerged as the bridge between detection and response. Its promise was simple: connect all your tools, codify your workflows, and automate repetitive tasks. For a while, it worked — until it didn’t.
Traditional SOAR tools were built on rigid, playbook-based architectures that required extensive scripting, constant upkeep, and deep technical expertise. They automated steps, but not logic. They could move faster, but not think faster.
In practice, legacy SOAR platforms:
Demand months of configuration before delivering value
Break whenever tools, APIs, or workflows change
Struggle to scale across hybrid, multi-tenant environments
Still rely on humans for contextual decisions — defeating their purpose
Scripted responses via playbooks and predefined automations
Automation Approach
Integrated and adaptive automation within the platform
Manual or rule-based workflows
Predefined playbooks, often complex to maintain
Scalability & Maintenance
High — cloud-native and adaptive
Heavy data storage and tuning required
High maintenance and scripting overhead
Human Interaction
Guided investigation with analyst-assisted decisioning
Heavy analyst involvement for correlation and query
Requires frequent human oversight and playbook upkeep
Ideal Use Case
Real-time detection, automated response, and rapid containment
Compliance, audit logging, and forensic investigation
Process automation, escalation, and workflow coordination
Key Limitation
Limited case management and orchestration
Lacks real-time detection and automation
Lacks intelligence, adaptive reasoning, and scalability
Each platform plays a role — but none unifies detection, automation, case management, and AI-driven reasoning into one system.
That’s what Torq HyperSOC™ delivers:
The real-time visibility of XDR
The historical depth of SIEM
The orchestration power of SOAR — all fused into a single, autonomous security operations platform
Why SIEM, XDR, and SOAR Alone Are No Longer Enough for the Modern SOC
For years, SIEM, SOAR, and, more recently XDR have defined the core of enterprise security operations. Each brought major advances: SIEM centralized visibility, SOAR automated repetitive tasks, and XDR unified detection across multiple domains. But as modern threats evolve faster than teams can respond, even these tools — alone or combined — can’t keep up with the scale, complexity, and speed today’s SOC demands.
The Limits of SIEM: Visibility Without Velocity
Traditional SIEM solutions provide long-term data correlation and compliance reporting, but they struggle with real-time incident response. Designed for static infrastructures, many SIEM tools can’t efficiently analyze or aggregate high-volume telemetry from hybrid and multi-cloud environments. This latency leads to missed detections and delayed response times, leaving gaps that attackers can exploit.
While SIEM remains invaluable for use cases like compliance and forensics, it wasn’t built to detect or prioritize critical threats in real time. Modern SOCs need more than historical context — they need the ability to act on threat intelligence instantly.
The Limits of SOAR: Automation Without Adaptability
SOAR emerged to automate workflows and streamline incident response, but its capabilities often stop short of full adaptability. Traditional SOAR systems depend on predefined playbooks that require constant upkeep, deep scripting expertise, and manual maintenance. As tools, APIs, and processes evolve, these brittle automations break — increasing cost and reducing efficiency.
As a result, SOCs spend more time managing playbooks than mitigating suspicious or malicious activity. Legacy SOAR can improve workflow automation, but it cannot identify, adapt, and learn from new attack patterns or context across multiple data sources.
The Limits of XDR: Detection Without Orchestration
XDR advanced detection by combining EDR, network, identity, and cloud telemetry into a single analysis layer. It’s powerful at correlating threat intelligence and reducing false positives, improving both visibility and security posture. However, most XDR systems remain detection-focused — not orchestration-driven.
They excel at recognizing critical indicators and offering insights into attack chains but rely on external systems for investigation, workflow coordination, and containment. Without deep orchestration or automated case management, response still depends on humans.
Proof Not Promises: Use Cases
The limitations above aren’t hypothetical — they play out in SOCs every day. Here’s how Torq AI SOC turns those pain points into measurable wins.
Data Breach Recovery
The problem: When a breach hits, security teams scramble across disconnected tools — SIEM logs in one tab, EDR alerts in another, identity data somewhere else. Every minute spent context-switching is a minute the attacker stays inside.
The solution: Torq HyperSOC™ unifies XDR, SOAR, and SIEM into a single operational layer, enabling AI Agents to automatically correlate alerts, enrich cases with threat intelligence, and execute containment actions across your entire stack — no tab-switching required.
The solution: Torq HyperSOC™ automates the grunt work with AI-driven workflows that handle alert triage, case enrichment, and remediation actions autonomously — freeing analysts to focus on threats that actually require human judgment.
HyperSOC doesn’t replace SIEM or XDR — it reduces dependency on them by delivering what they can’t: reasoning, orchestration, and real-time decision-making at machine speed. It unifies threat intelligence, incident response, and threat hunting into a single adaptive system that reasons through context, automates decisions, and learns continuously.
Torq HyperSOC:
Leverages SIEM for historical data while automating detection and correlation in real time
Integrates with XDR to analyze, detect, and prioritize critical events with AI-driven context
Surpasses SOAR, replacing static playbooks with dynamic, self-optimizing workflows
The result is a SOC that’s faster, smarter, and self-improving — one built for the threats of today and tomorrow.
Introducing HyperSOC: The Future of SOC Autonomy
Friendly to your existing stack (XDR, SIEM, or SOAR), Torq HyperSOC is built for tomorrow’s SOC. It’s the connective layer that turns detection into decision, and decision into action — instantly, intelligently, and at scale.
What it delivers:
Agentic AI:HyperSOC reasons through context, adapts to new signals, and evolves with every incident — creating a SOC that gets smarter with every case.
No-code/low-code workflow builder: Build and deploy end-to-end workflows in minutes. HyperSOC’s visual builder eliminates complex scripting, empowering analysts and engineers alike to automate detection, investigation, and response at scale.
Unified lifecycle: From detection to investigation, response, case management, and audit — HyperSOC brings every stage of the SOC workflow into one cohesive, transparent platform. No handoffs. No silos. No guesswork.
Scale and speed: Whether handling thousands of alerts a day or managing hundreds of environments, HyperSOC delivers elastic, multi-tenant performance built for global enterprises and MSSPs.
Leveraging XDR: HyperSOC ingests and correlates cross-domain telemetry from endpoints, networks, cloud, and identity systems, transforming raw XDR detections into full-lifecycle, autonomous response actions.
More advanced than SOAR: Where traditional SOAR ends, HyperSOC begins. It replaces brittle playbooks with dynamic, context-aware automation that understands intent, drives consistent triage, and integrates native case management.
HyperSOC empowers your team to detect faster, respond autonomously, and scale operations across complexity while maintaining control.
How to Migrate from SOAR to Torq HyperSOC + SIEM + XDR
1. Build Your Migration Plan
Start by auditing your existing SOAR environment: playbooks, integrations, and key processes. Identify what works, what’s broken, and what’s slowing you down. Then, map those workflows to HyperSOC’s automation framework — merging redundant steps, removing manual approvals, and rebuilding for efficiency.
Torq’s team works side-by-side with you through JumpStart, our hands-on enablement program, to design a custom migration roadmap that meets your operational and business goals.
2. Migrate and Modernize Workflows
Don’t copy your old playbooks — rebuild smarter. HyperSOC replaces static, script-heavy automations with dynamic, AI-assisted workflows that are easier to maintain and infinitely more flexible.
Visual workflow builder: Build and test workflows in real time — without coding.
AI workflow builder: Create entire automations through natural language prompts.
Seamless integrations: Connect instantly with 300+ tools, from EDR, XDR, and SIEM to identity and cloud platforms.
This phase is where many teams realize that what took 50 workflows in their old SOAR can now be done in 30 or less — faster, cleaner, and with built-in threat intelligence.
3. Validate and Go Live
Test before you flip the switch. HyperSOC lets you test every step of your automation in a dedicated staging environment, ensuring complete confidence before production rollout.
You can even run both systems in parallel during cutover — minimizing downtime while your SOC transitions to full Hyperautomation. Once validated, you’ll begin decommissioning your legacy SOAR and start measuring real impact: faster MTTR, reduced alert fatigue, and higher analyst capacity.
4. Continue to Work with Your Existing Stack
SIEM + HyperSOC: Your SIEM remains the central hub for log collection, long-term analytics, and compliance. HyperSOC consumes that telemetry in real time, enriching alerts with contextual data from users, assets, and cloud environments. When high-fidelity incidents are detected, HyperSOC automatically triages, investigates, and initiates the appropriate workflow.
XDR + HyperSOC: XDR delivers cross-domain detections across endpoint, network, and cloud. HyperSOC extends that reach by automating correlation, response, and case management — turning XDR signals into full-lifecycle incident handling. Together, they form an adaptive defense system that detects, decides, and responds at machine speed.
Unified Feedback Loop: Every automated action — from isolation to credential revocation — feeds back into your SIEM and XDR. This creates continuous learning, measurable outcomes, and audit-ready visibility across your entire SOC.
5. Scale Autonomy with Agentic AI
Once your core workflows are live, HyperSOC’s AI SOC Analyst, Socrates, and multi-agent system take over the heavy lifting. These AI Agents continuously triage, enrich, and resolve incidents — learning from every case. Analysts move from chasing alerts to supervising intelligent, explainable automation.
“Transitioning to Torq was smooth. Torq’s speed and flexibility allowed us to migrate and optimize our workflows quickly and their support team was instrumental in ensuring a seamless migration.”
– SOC manager, leading security company
Measuring ROI of HyperSOC Adoption
Adopting Torq HyperSOC™ is a measurable business transformation. Here’s how security teams quantify the impact:
Operational efficiency: Dramatically shorter triage cycles, fewer escalations, and near-zero manual handoffs. What once took hours now happens in seconds.
Cost optimization: Retire legacy SOAR tools, reduce maintenance overhead, and lower the analyst-to-alert ratio without sacrificing coverage.
Enhanced security posture: Broader detection visibility, faster containment, and reduced dwell time lead to measurable risk reduction across every environment.
Analyst empowerment: Teams spend less time on repetitive tasks and more time investigating complex threats, driving higher morale, engagement, and retention.
Business visibility: HyperSOC turns SOC performance into business impact— tracking automation rates, containment speed, and incident volume trends that tie directly to operational resilience and ROI.
The Future Isn’t XDR vs. SOAR — It’s HyperSOC
For years, security teams have been forced to choose: XDR for detection, SOAR for automation, SIEM for visibility. But that model no longer fits the scale, speed, or sophistication of modern threats. Attackers have evolved — your SOC must too.
Torq HyperSOC™ ends the debate. It unifies detection, investigation, automation, and response into a single, intelligent system — working seamlessly with your existing SIEM and XDR to deliver real-time, autonomous defense. HyperSOC doesn’t just automate; it reasons, adapts, and acts — turning every signal into a complete, auditable response.
See how HyperSOC transforms your SOC from reactive to autonomous — and redefines what’s possible in security operations. Get your copy of the Don’t Die. Get Torq manifesto.
SIEM (Security Information and Event Management) and SOAR (Security Orchestration, Automation, and Response) play complementary but distinct roles.
SIEM collects and normalizes logs for visibility, compliance, and historical analysis.
SOAR acts on that data to automate incident response workflows and orchestrate actions across tools.
But modern SOCs often replace SOAR with HyperSOC and integrate their SIEM into automated responses with Torq, which includes logging, detection, automation, and response in one unified platform.
What are the differences between XDR and SIEM?
XDR and SIEM both handle threat data, but they differ in real-time intelligence and automation:
SIEM aggregates and correlates logs, offering long-term data storage and compliance reporting. It’s built for visibility, not speed.
XDR is focused on active, real-time detection and response, correlating data across multiple security layers to identify and contain threats instantly. In practice, SIEM tells you what happened, while XDR helps stop it as it happens.
Torq HyperSOC integrates with both, combining SIEM’s visibility and XDR’s intelligence with fully automated workflows for end-to-end defense.
Does XDR replace SOAR?
No — XDR doesn’t replace SOAR, but it does overlap in specific detection and response capabilities. XDR (Extended Detection and Response) focuses on data correlation and automated response across endpoints, networks, and cloud environments. It unifies visibility and detection.
On the other hand, SOAR (Security Orchestration, Automation, and Response) is designed for workflow orchestration — connecting multiple tools and automating manual steps across the SOC. The strongest security environments combine both: XDR for detection and HyperSOC as a SOAR replacement for orchestration and response. Torq unifies these functions into one adaptive, AI-driven system.
How does the integration complexity of SOAR compare to XDR?
Traditional SOAR tools are complex to integrate. They require manual scripting, API maintenance, and constant playbook updates. Every new tool or process adds friction. XDR platforms are typically easier to deploy, with native integrations and prebuilt data pipelines for faster time to value. HyperSOC bridges this gap, offering SOAR flexibility without upkeep. It connects seamlessly to your XDR, SIEM, IAM, and cloud tools through no-code or low-code workflows that scale effortlessly.
What makes HyperSOC different from XDR and SOAR?
HyperSOC goes beyond the traditional limits of XDR and SOAR by unifying detection, automation, orchestration, and case management in one platform — powered by agentic AI.
Unlike XDR, which focuses mainly on detection and analytics across endpoints, networks, and clouds, HyperSOC adds full-lifecycle automation — triage, investigation, containment, and remediation — all without manual intervention.
Unlike SOAR, which relies on static playbooks and heavy scripting, HyperSOC uses dynamic, AI-driven workflows that adapt to real-time context.
Unlike both, HyperSOC continuously learns from every incident, optimizing future responses through intelligent feedback loops.
HyperSOC merges XDR’s visibility, SOAR orchestration, and AI’s adaptability — creating an autonomous, self-improving SOC built for scale, speed, and resilience.
Managed detection and response (MDR) providers faceskyrocketing demand and rising stakes. The MDR market is projected to grow to $11.8 billion by 2029 (up from $4.1 billion in 2024), a 23.5% compound annual growth rate driven by the intensifying landscape of advanced threats and sophisticated attacks, as well as ongoing cybersecurity talent shortages.
But as demand surges, security operations teams within MDRs are challenged to scale efficiently, deliver consistent SLA-backed services, and preserve razor-thin margins — all too often while relying on legacy security orchestration, automation, and response (SOAR) systems that crumble under cloud workloads and multi-tenant complexity.
To thrive in this new era, MDRs need a security automation platform that helps them scale efficiently, deliver measurable outcomes, and protect profitability. MDRs, meet Torq Hyperautomation™.
What is MDR and Why It Matters for Enterprises
Managed detection and response (MDR) is a security service model where organizations outsource their cyber threat monitoring, detection, and incident response to a dedicated provider.
Unlike traditional managed security service providers (MSSPs), which often focus on alerting, MDRs deliver hands-on investigation and active remediation — making them a critical lifeline for enterprises facing resource constraints, nonstop cyberattacks, and the need for stronger endpoint protection.
For enterprises, security operations through an MDR deliver three key benefits:
24/7 monitoring and response: Around-the-clock visibility and containment coverage when internal teams can’t keep pace with threat volume.
Access to scarce talent: MDRs provide experienced security analysts in a market plagued by skills shortages.
Faster detection and response: MDRs reduce dwell time by investigating, triaging, and remediating alerts before they escalate into costly breaches.
As enterprises embrace hybrid cloud, SaaS, and remote work at scale, the need for effective MDR solutions has never been greater. But delivering MDR services profitably requires providers to overcome the complexity of multi-tenant environments, tool sprawl, and the relentless flood of Tier-1 alerts.
Legacy SOAR promised to solve these challenges, but it wasn’t built for hybrid cloud or multi-tenant operations, leaving MDRs stuck with brittle playbooks, limited integrations, and endless tickets that drain security analysts instead of protecting customers. Then, security Hyperautomation entered the scene.
MDR Services and Solutions Enhanced by Hyperautomation
Torq Hyperautomation strengthens every cybersecurity service that MDRs deliver, helping providers meet rising demand without sacrificing margin by automating:
Threat detection and triage: Torq automates Tier-1 investigations, eliminating false positives and noise across tenants.
Incident response and auto-remediation: Hyperautomation streamlines workflows so low-level cases close autonomously while security analysts focus on complex cyber threats, ensuring providers can respond faster and consistently remediate incidents across all tenants.
Reporting: Torq creates customer-ready reporting and dashboards to demonstrate SLA performance and ROI, along with cross-tenant workspace reporting capabilities to understand big picture operational performance.
Torq consolidates workflows and automates repetitive responses to eliminate ticket fatigue — preventing analyst burnout while ensuring every customer receives consistent, SLA-backed protection. It also unifies operations across tenants so MDR services scale seamlessly, reduce manual burden, and deliver higher-value outcomes that drive stickiness.
Increasing Efficiency and Margin with MDR Security Automation
By ditching legacy SOAR, security MDRs can finally escape the inefficiencies that drain margins and stall growth. With Torq Hyperautomation, MDRs can:
Automate up to 90% of Tier-1 case analysis tasks with an autonomous AI SOC Analyst.
Onboard and provision new customer environments 18x faster.
Handle 5× more security events without increasing headcount.
Deliver higher-value services that reduce churn and increase stickiness.
Meet SLAs more consistently through automation-first response.
Consolidate tooling and integrate disparate systems to lower costs and increase efficiency.
Torq automates large portions of investigation, analysis, and response while also augmenting security analysts with AI-driven case summaries, natural language investigation, and intelligent prioritization. This reduces human time per case, enabling MDRs to process more events with the same headcount while keeping analysts focused on high-value investigations — better protecting both margins and customer outcomes.
“With Torq Hyperautomation, we are significantly increasing productivity and efficiency, ensuring that our customers gain better evidence, analysis, and control over their cybersecurity, while staying protected from external threats and operational risks.”
And because Torq supports no-code, low-code, and full-code approaches on a cloud-native, multi-tenant foundation, MDRs gain the flexibility to scale faster, improve case management with AI, and future-proof their operations.
MDR Cybersecurity: Faster Onboarding and Scalable Operations
Onboarding has historically been one of the biggest pain points for MDR providers, delaying ROI for both the provider and their customers. Torq automates onboarding so new tenants can be provisioned in minutes, not weeks, while repeatable workflows can be shared across environments for faster ramp-up.
10x faster onboarding: Standardize and automate customer onboarding and ramp-up, replicating proven workflows across tenants to onboard customers 18x faster.
Limitless integrations: Connect instantly with every tool in the customer’s stack, expanding value and widening the addressable market.
“New customers are seeing faster onboardings than we’ve ever seen.”
Torq’s event-driven architecture ensures MDRs scale operations elastically across cloud environments, handle more events per analyst, and maintain SLA-backed performance as customer demand grows.
Choosing the Right Security MDR Provider for Your Organization
When evaluating MDR or managed security service providers, enterprises should look for:
Comprehensive service coverage that spans detection, investigation, and remediation.
Proven automation capabilities that enable faster response, SLA adherence, and cost savings.
Integration flexibility to work seamlessly with diverse and evolving enterprise stacks without lock-in.
By enabling security MDR service providers to automate Tier-1 case work, integrate with any customer stack, and standardize workflows across tenants, Torq not only helps MDRs scale profitably but also strengthens customer loyalty. The result is a service model that delivers consistent SLA-backed protection, measurable ROI, and the kind of resilience that enterprises demand from a long-term, strategic security partner.
The Future of MDR is Hyperautomation
The MDR market is exploding, but growth alone won’t guarantee success. Providers that cling to legacy SOAR will find themselves drowning in alerts, missing SLAs, and watching margins erode.
With Hyperautomation, security outcomes are delivered at machine speed, customers are onboarded in minutes, and undeniable ROI is proven with every engagement. Torq gives managed providers the scale, efficiency, and intelligence they need to thrive in a high-demand, margin-tight market, turning the challenges of multi-tenancy, tool sprawl, and endless Tier-1 noise into opportunities for growth and customer loyalty.
SOAR is dead (like, dead dead) — but it’s still killing managed services. Get the Managed Services Manifesto to see why Torq Hyperautomation is the future of scalable, SLA-ready MDR.
Managed Security Service Providers (MSSPs) typically focus on monitoring and alerting, notifying customers when threats are detected. Managed Detection and Response (MDR) providers) go further by actively investigating, triaging, and remediating threats on behalf of customers, providing hands-on expertise and faster outcomes.
How does MDR enhance cybersecurity?
Managed detection and response (MDR) enhances cybersecurity by delivering a comprehensive, proactive approach to threat detection and incident response. MDR strengthens defenses by combining continuous 24/7 monitoring, expert threat hunting, integrated endpoint protection, advanced detection, and rapid automated response capabilities.
What types of industries benefit most from MDR services?
Security MDR services can benefit a wide array of industries, but are especially valuable for industries with strict compliance needs or sensitive data — such as financial services, healthcare, government, and critical infrastructure — where faster detection and response are critical.